Step by step: removable storage cabinets
Printed From: The Brick-yard
Category: T5 Section
Forum Name: T5 Chat
Forum Description: Forum for T5 specific chat
URL: http://www.brick-yard.co.uk/forum/forum_posts.asp?TID=52857
Printed Date: 24 Apr 24 at 04:11
Software Version: Web Wiz Forums 12.06 - https://www.webwizforums.com
Topic: Step by step: removable storage cabinets
Posted By: Ex-car bloke
Subject: Step by step: removable storage cabinets
Date Posted: 03 May 10 at 18:02
|
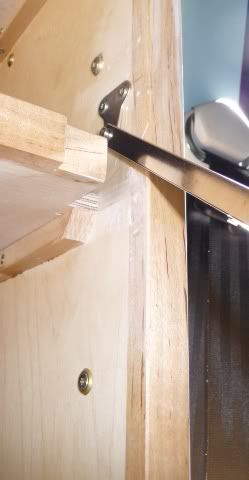
This is the story of my new removable van furniture. I’ve had so much help from other van owners that I feel motivated to make this mini-blog in the hope it will end up being of some help to someone somewhere. By the way I have it on a Word document in the unlikely event that someone may want me to email it to them. Our previous approach to van camping, even for long trips, of “chuck it all in the back and hope we can find things when we need them”, needs to be upgraded. My T5 is a daily car, work van and camper, constantly changing its use, so I’m forever fitting and removing seats, the full width deck, the chipboard floor protector etc. So, I have no interest in a regular camper conversion. I need something that will easily be converted into a “camper” and back again. I have no need for fridge or specific cooking units or for bed space as I have a Reimo roof and bed fitted and we take a tent-camping approach when it comes to equipment. So it’s organised storage space we need, nothing more. I’m a furniture maker by trade ( http://www.rossketteridge.com/ - www.rossketteridge.com if you’re interested) so feel like I can’t just bodge something together quickly and to be honest I’m really enjoying the process of designing something with such different needs to my usual work. I’d like to buy Voringher ply but for cost and ease of supply, despite the weight penalty, I’m going to use birch ply in 12mm/9mm and keep the weight down in the doors by making them framed 6mm ply. I’ll be using solid birch in light sections for lippings and strengthening braces so the end result should be strong and not too heavy. I figure that the additional fuel use for periodic camping trips is minimal in the grand scheme of things; it’s not like I’ll be carting the cabinets around permanently like in a fully converted van. My overall thinking is: Right hand side of van: a 400mm deep cabinet incorporating two main storage sections and two full width, fully extending drawers. I know these will add weight but in my experience drawers are by far the best storage device for easy access to a lot of small stuff. I’ve had too many years of camping where I seem to rummage in at least three bags every time I need something. The drawers will double as storage boxes as they will be on clip-off metal runners, so another benefit is that the camping gear can be in the garage all packed and ready to clip into place at short notice. I may make them non-square so that I use ever cubic centimetre of the space available. Left hand side of van: A narrow cabinet, extending in depth no further into the van than the rear wheel arch that incorporates a fold down flap door which will double as a table top. To accommodate mini-me we now need to camp now with the double rear seat in place so this restricts the area for the cabinet to rearward of the seat back. Detail considerations: My van’s mechanicals are treated with great care but otherwise it gets dirty and bashed about a lot so I don’t go in much for carpeted surfaces and such like. The cabinets will have rounded edges and be finished in Osmo Polyx Oil, a hardwearing satin clear finish. So the overall look will be light, easy to clean and functional. I’ll probably carpet the insides to minimise rattles. To save space and weight there will be no handles, but integral grips. I agonised a lot over the method of holding the doors closed without rattles. After searching through cabinet makers’ suppliers and yacht chandlers and considering every catch, lock and latch ever invented, I reverted to simple basics. So, the doors will close onto concealed magnets which will hold them in place when we’re stationary. No catches to get in the way of luggage or to get dirty. When travelling I’ll secure all the doors and drawers with simple wooden toggle twist-locks. Rattles will be avoided by fixing small urethane buttons to the closing edges, so there’s no wood-to-wood contact. To maximise space the cabinets will be without backs and will probably not have shelves. I may make dividers for the drawers to stop stuff shifting about. The work starts: assessing the space This is the blank canvas. The wooden rails are there to fix the single span decking and will provide fixing points. Because they are fixed to the trim fixing points, they don’t run parallel with the floor so cannot be used as reference points. 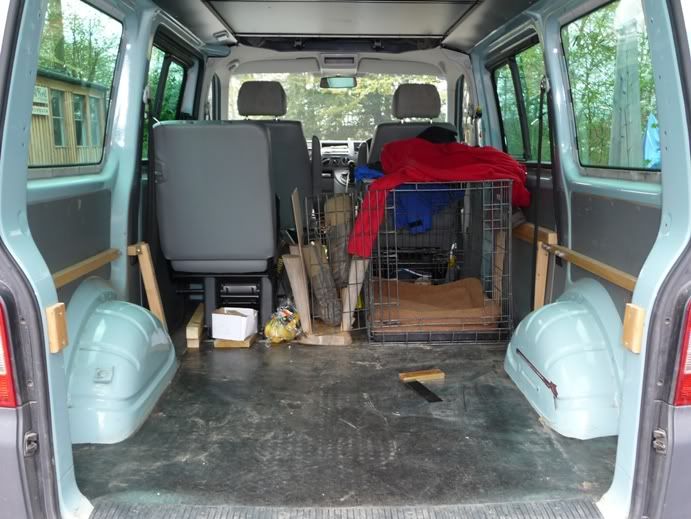 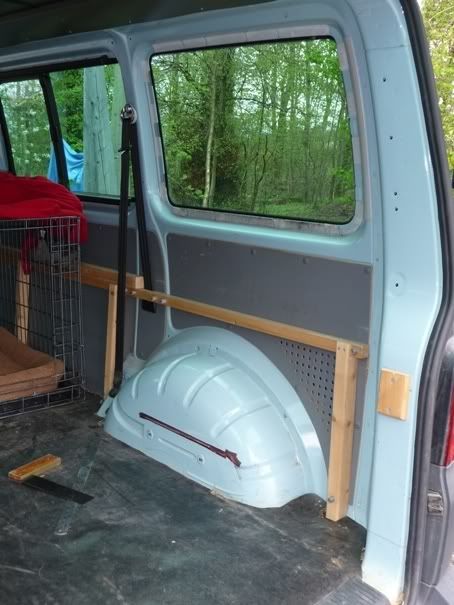  Getting a reference point To establish the horizontal and vertical planes and the plan view left/right/front/rear, you start with the van floor and from here use a giant square. Mine’s made from chipboard. The material doesn’t matter as long as it’s straight and square in every direction. 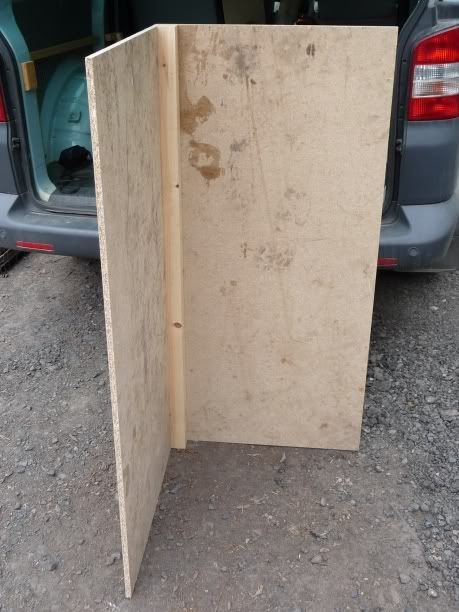 I placed the square in a position where one of the faces was on the same plane as the end face of the cabinet. I used the line of the wheel arch at floor level as the front/rear line. I used the metal rule just to align the square better along this line. 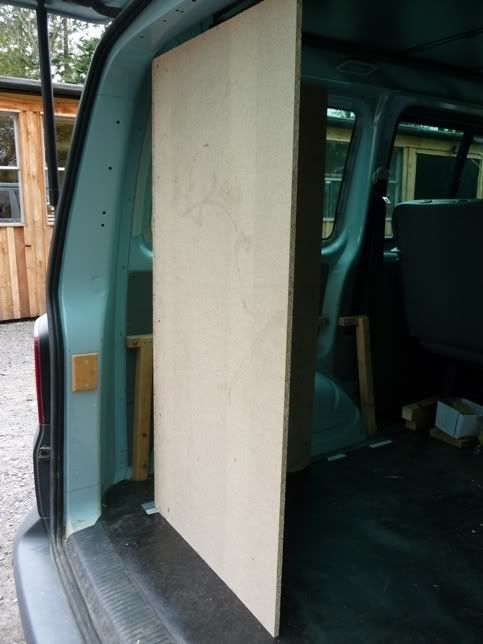 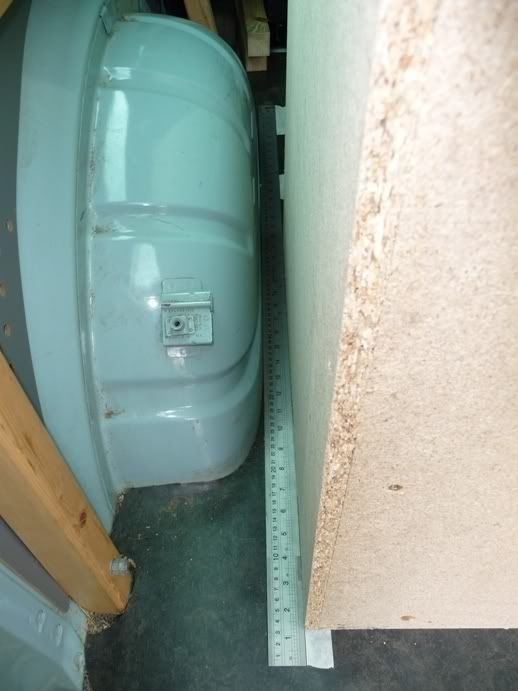 Measuring up Using a square and a ruler, I measured key points along the internal van shape. At this stage I’m just aiming to make a rough template. Each point is marked with a line and a distance figure. I know how far the position of the chipboard square is from the eventual position of the outer edge of the cabinet so I can do this job with the chipboard square placed any distance from the van side, within reason. I make sure I don’t forget to mark the position of the front and rear of the cabinet on the floor.
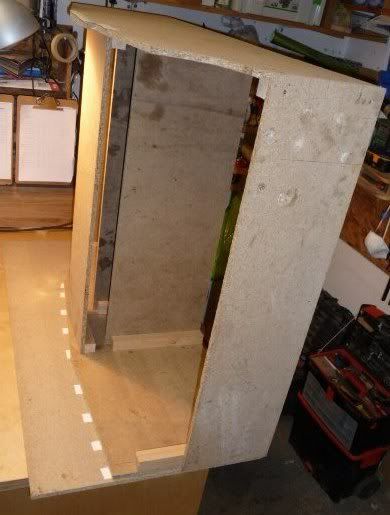
   Making the rough 3-D template From the chipboard square that I marked out, I joined the dots, cut them out and made up a 3-D template out of the rest of the chipboard and some softwood. The purpose of this is to get a proper feel for how deep and long I want the final cabinet to be and where I want the shelves, drawers and doors to be positioned. For example the drawers should naturally finish just where the window frame line goes towards the glass, so I can use this space in the cupboard above. The other purpose of this template is to provide a base for the more accurate marking-out stage, where I will stick pieces of thick paper along the edges to more closely trace the shape where it meets the van sides. That’s for later.
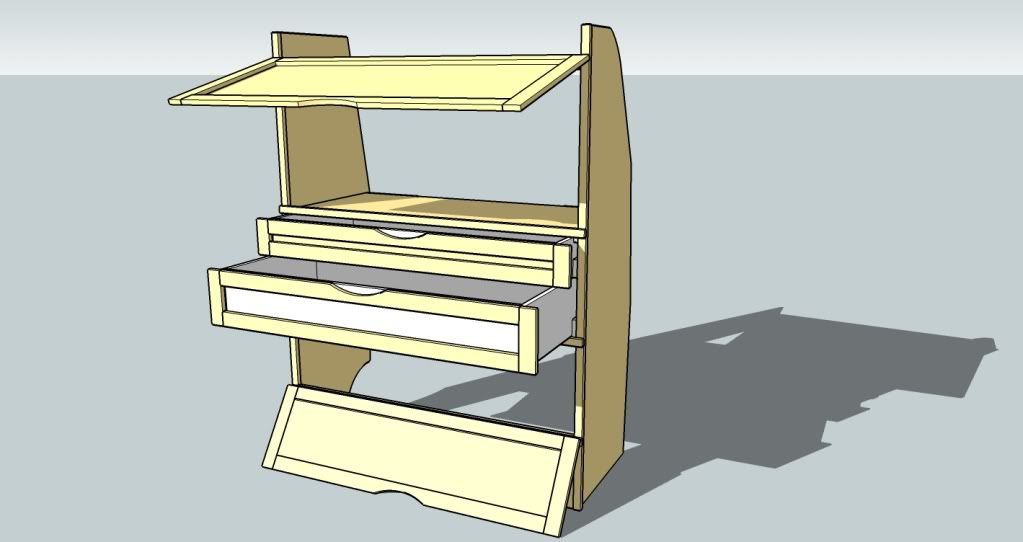
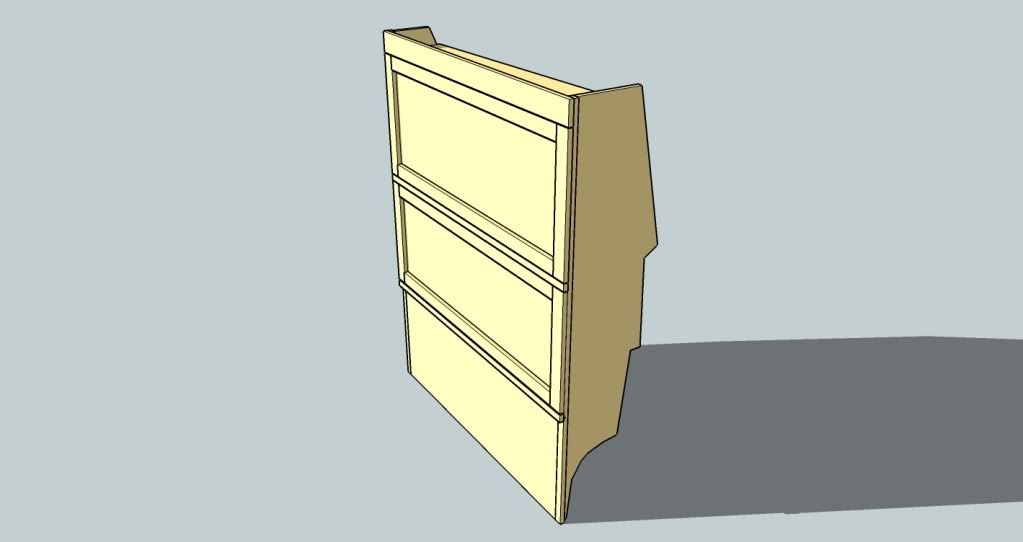
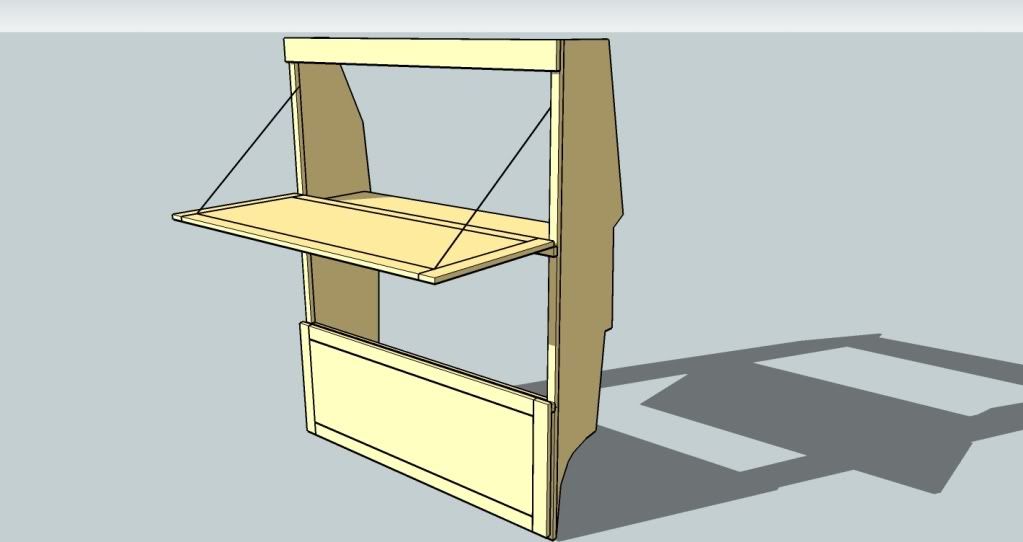
 Before I make the left hand cabinet template I held a board in the intended position of the cabinet side just to visualise the final space. I tried the dog cage for fit (as they will sometimes travel with us) and measured the clearances for drawers, doors and table top.  SketchUp modelling Like most furniture makers I use Google SketchUp extensively. It is a wonderful (and free!) tool for anything three dimensional, from garden design to decorating to full house design. I’ll work up a fully detailed drawing so that I can confidently make all the components separately and know they will all fit together. I can also try out various design ideas, different rail thicknesses, shelf positions, door and drawer formats and much more, using SketchUp. These are my working drawings. I haven’t put every detail in, such as the rounded edges on the doors, but otherwise it’s an accurate representation of what I’m planning to make.   You can see on these that the edges of the 12mm ply are strengthened by the bonded-on 12mm x 20mm braces which are used on the shelf edges as well. They also hide the ply edges and give the impression of solid birch wood, as well as giving firm fixings for hinges. The rails above and below the drawers are there to provide a base for the toggle locks I mentioned above. The scoop handles will have contoured finger grips inside the curves. The doors are kept single not double to save weight and keep it simple. The top door is held by a lightweight stay that is released when the door is pushed beyond 90 degrees and the bottom door just rests on the floor when open. Trying to keep things simple! ------------- ECB 2006 SWB 174 window van 
|
Replies:
Posted By: Ex-car bloke
Date Posted: 08 May 10 at 21:54
|
Been mega busy at work so not done the work on it I'd hoped this week. However, I received delivery of the drawer runners so have been able to do accurate drawings of the drawers and figure out how the drawer handles will work. I'm making the bases right at the drawer bottoms rather than raised up in a groove, so the lost space is minimised.
I've also done some weight reduction after lifting a sheet of 12mm birch ply and being reminded how bloomin' heavy it is! So I'm now planning to use 9mm ply for the shelves not 12mm, and the rear of the drawer box can be reduced to from 9mm to 6mm and reduced to two separate small sections rather than a full panel.
 I've also done my cutting list so hopefully will get some time on it in the workshop next week. ------------- ECB 2006 SWB 174 window van
|
Posted By: Ex-car bloke
Date Posted: 11 May 10 at 10:03
|
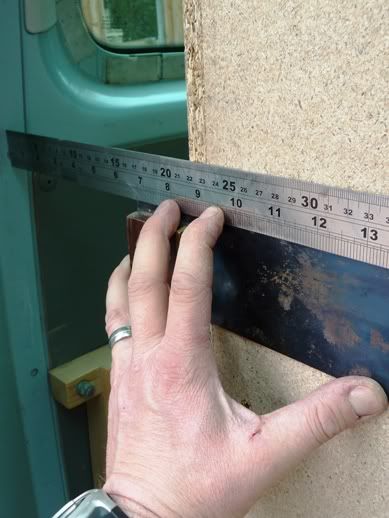
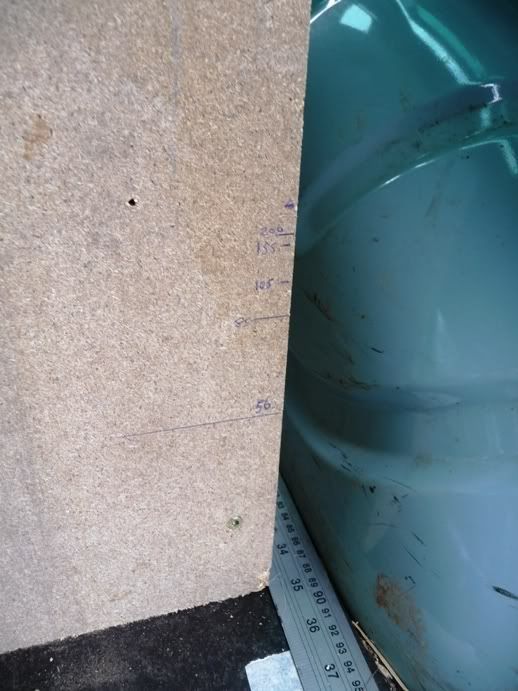
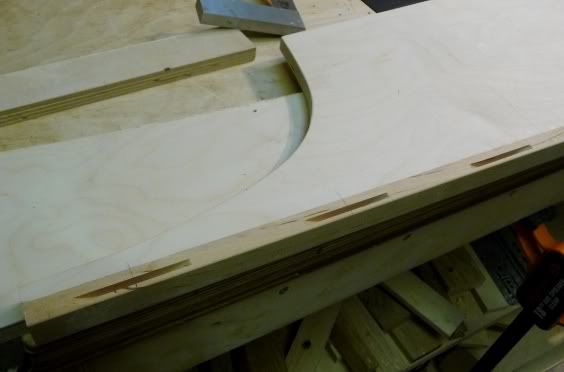
The next stage is to make the template more accurate, so that the shaped edge of the ends of the cabinet fit the van better. To do this I placed the mock up into position and stuck bits of thin card along the edge with the ends of the cards touching the van side. This card edge is now an accurate copy of the shape I need. [EDIT: sorry about photo orientation, Photobucket keeps turning them through 90 degrees for some unknown reason...]
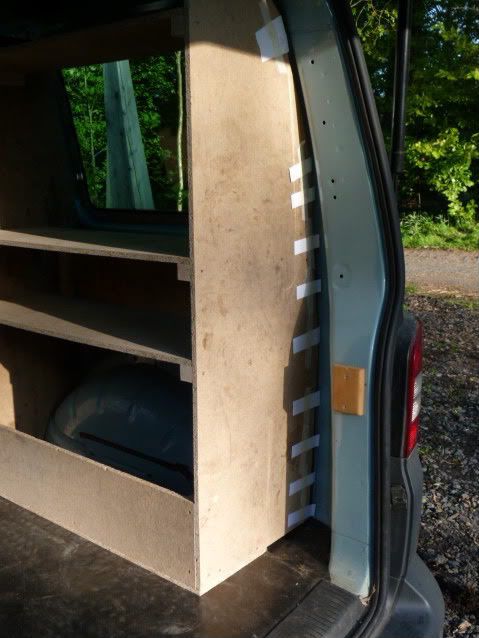  The template is now placed onto a piece of chipboard and a line drawn around the card edge.
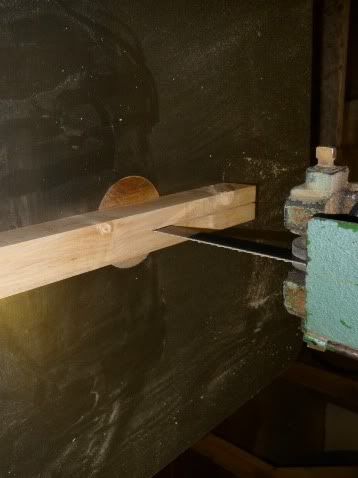
Next stage is to screw the 12mm birch ply under the chipboard. The blade of the jigsaw cuts on the upstroke so the sacrificial piece (ie the chipboard) needs to be on top. If using a bandsaw it would be underneath. This prevents “breakout” that bane of sawing plywood, especially across the grain, where without a sacrificial piece you end up with a horrible broken edge extending as far back as 10mm. 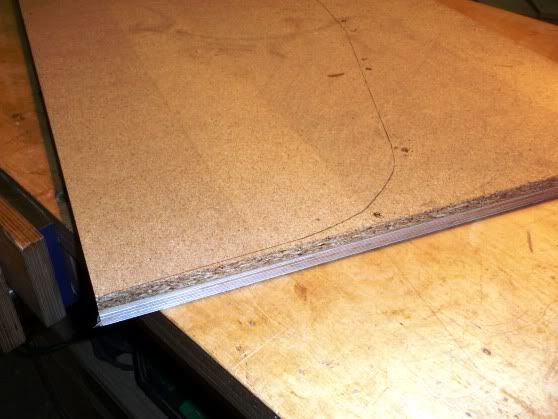 Next I cut along the line with the jigsaw. It’s an awful, crude tool, the jigsaw, and on large shapes impossible to get a decent straight or curved line, especially with chipboard since it keeps being diverted by hard bits of glue and imperfections in the surface. For this reason a degree of sanding of the edge is needed afterwards. 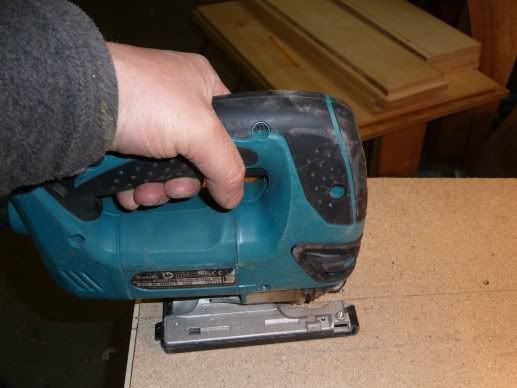  The end result is a very nice clean edge, though and well worth the effort. And it fits perfectly! 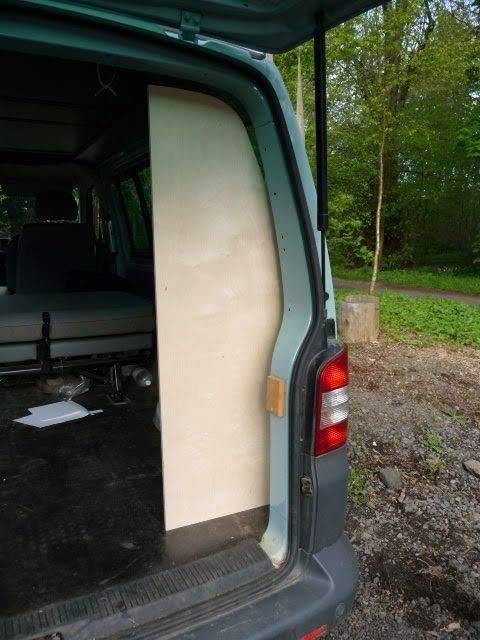
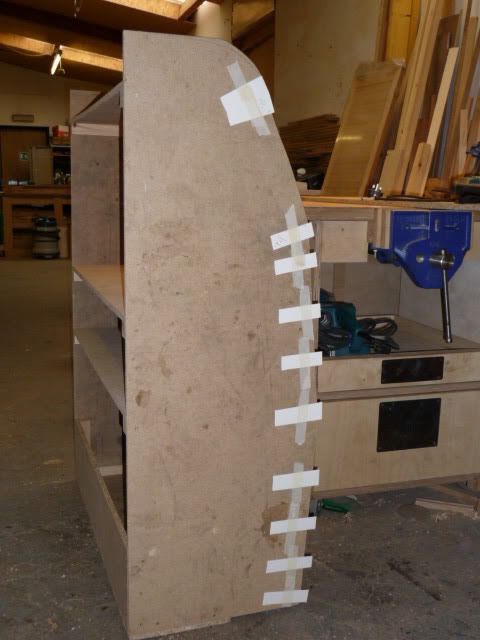
I repeated this process on the front vertical panel of the cabinet. In addition, I had to shape the curve where the cabinet meets the wheel arch, with a bevelled edge. An angle grinder and sanding disc is perfect for this. This bit is inside the cabinet so the finish is not critical. 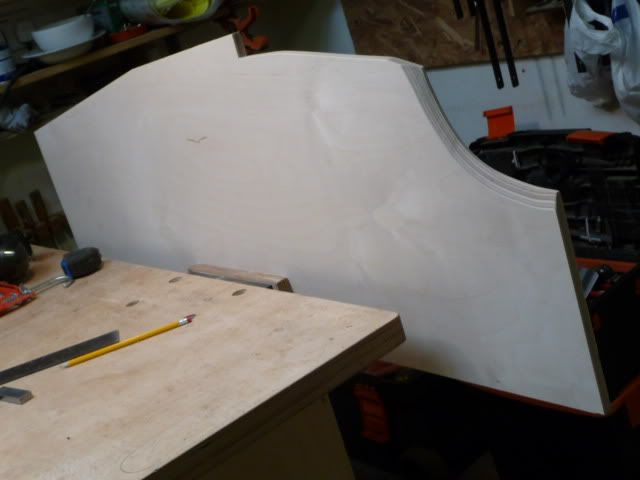 ------------- ECB 2006 SWB 174 window van
|
Posted By: Ex-car bloke
Date Posted: 14 May 10 at 22:23
|
Spare time has been scarce this week but I managed to grab half an hour or so this evening to get the final panel template measured, scribed, cut and trimmed for fit. This is for the front panel of the left hand unit, the narrow storage unit. The final dimensions will be narrower than this (it will be no wider than the wheel arch) but I made the template over-width so that the chipboard didn’t disintegrate at the thin bottom shape. 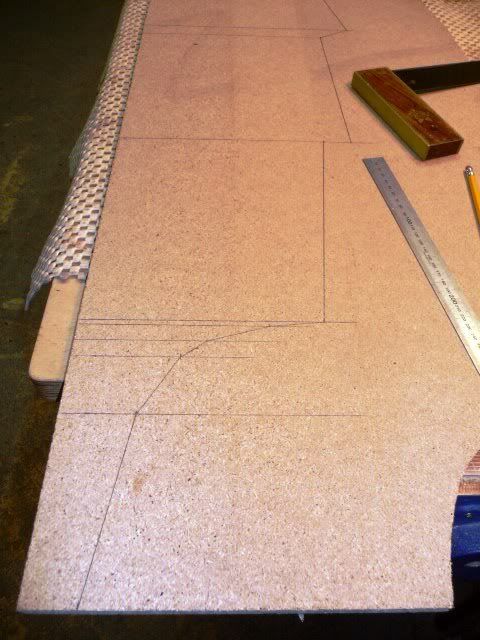 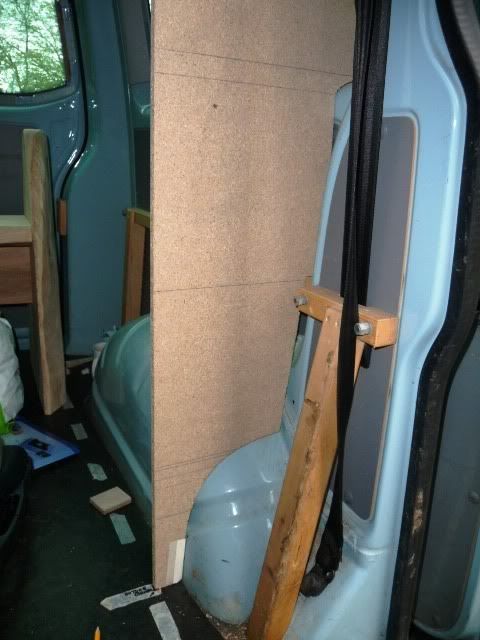 ------------- ECB 2006 SWB 174 window van
|
Posted By: Ex-car bloke
Date Posted: 17 May 10 at 17:02
|
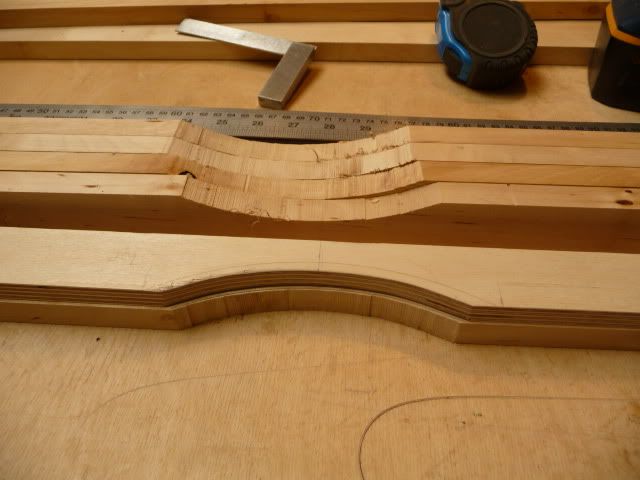
Decent progress today. I made a good profit on a piece of furniture last week so I'm giving some unpaid time to the van project this week. I’ve produced detailed drawings of the left hand (narrow) unit with all dimensions so that I can make my cutting list. I’ve gone for simplicity and lightness again with full width doors, this time each hinged at their bottom edge. The lower one is designed to open and hang down allowing the cabinet to be open when camping without the door getting in the way. The upper door folds down and becomes a table. I’ll probably use metal folding stays to hold it when open. I need to make a neat way of having it like a panelled door on the outside and a flush top table on the inside. The front lower panel sits tight against the wheel arch so the whole unit steals no space from the van, effectively. I haven’t bothered to draw in the door handles or the shelves.
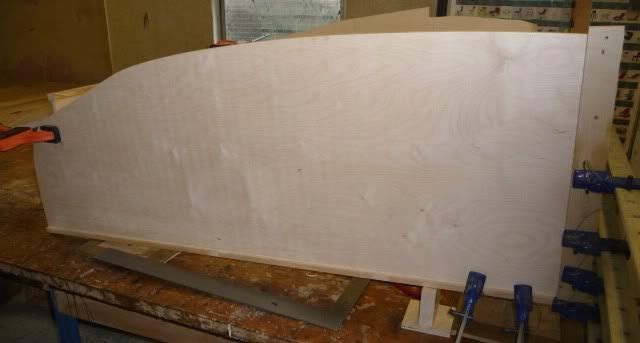
  Next I cut out the side panels of this cabinet using the method described earlier. They needed some reshaping at each stage, quite a lengthy job in all, but he result is good, with nice clean edges and smooth curves. 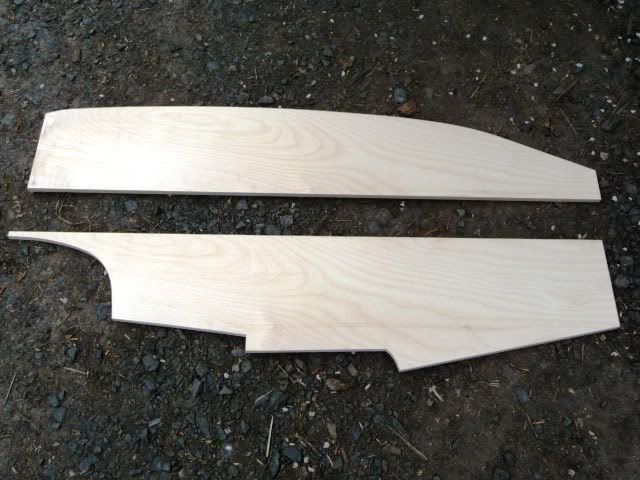 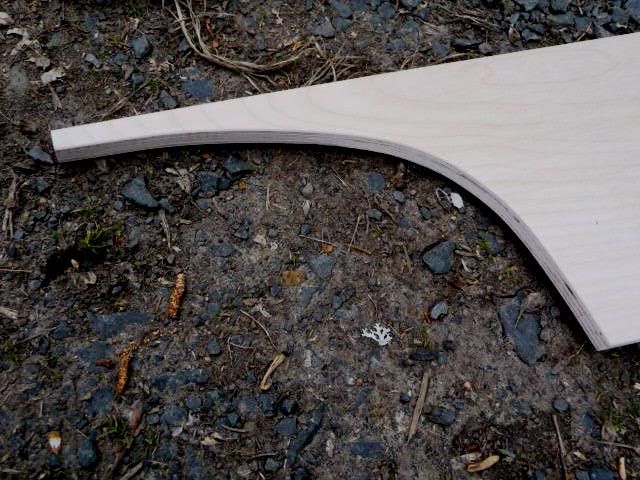 Now I have my cutting list. Over 100 wooden components in birch ply and solid birch. I’m wondering if I shouldn’t have gone down such an obsessive route now – I just can’t help myself. ------------- ECB 2006 SWB 174 window van
|
Posted By: BlackBeltBlakey
Date Posted: 18 May 10 at 08:59
|
Interesting stuff EBC, keep it up! ------------- 2007 130PS SWB Pearl Black Kombi. My http://blakeysvan.blogspot.com/ - Van Blog . |
Posted By: Ex-car bloke
Date Posted: 18 May 10 at 13:16
|
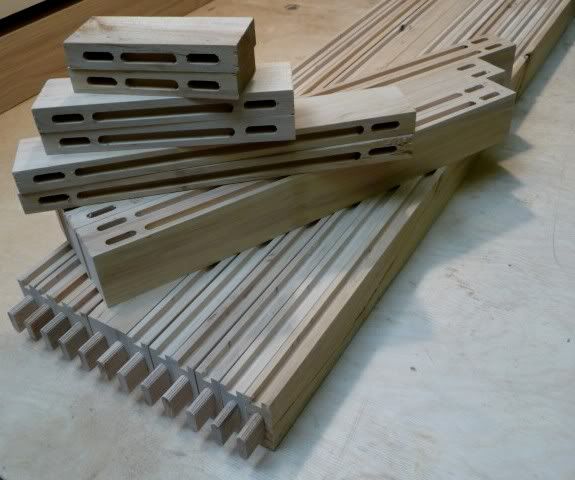
Next, making the rails and stiles for the doors and drawer fronts. Take a lump of kiln dried birch. 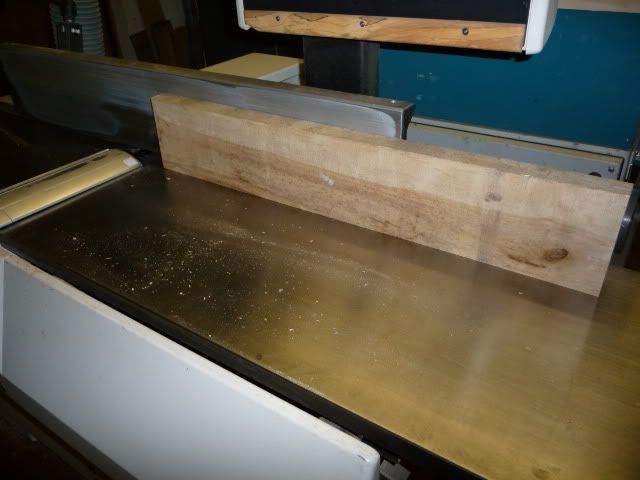 Plane it, thickness it, resaw it and thickness it again and you end up with some 16mm x 40mm pieces.
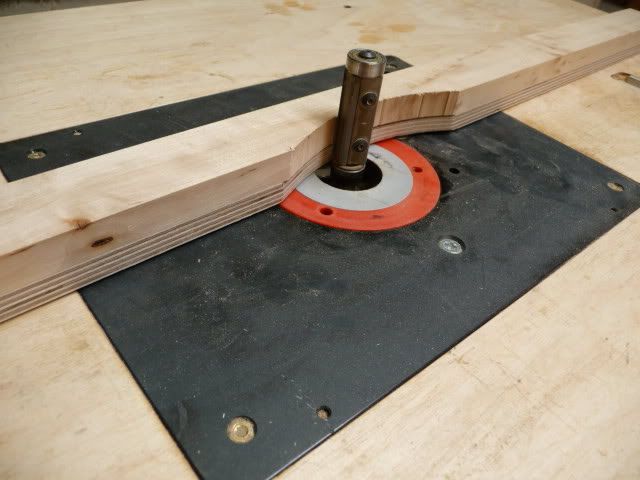
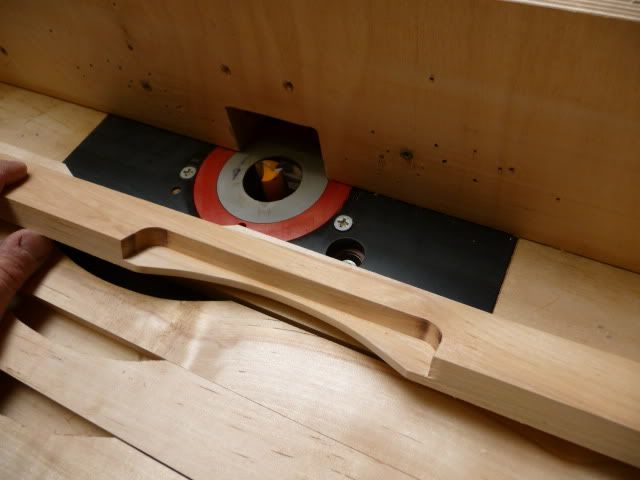
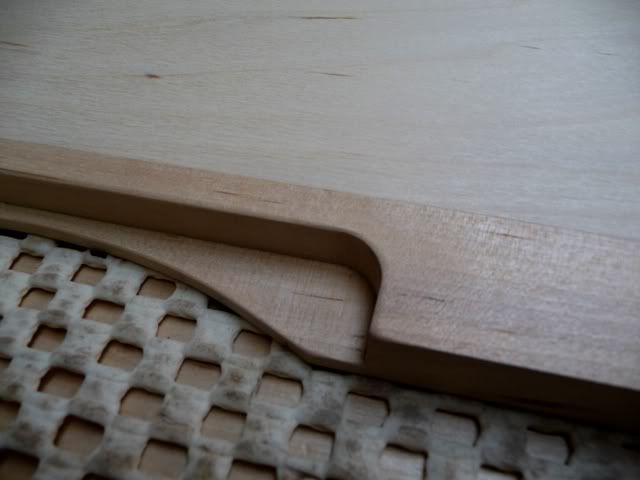
   Making the handle cut-outs involves making a ply template, screwing it to the back of each rail, drawing round the shape, bandsawing each close to the line and then refitting the template to allow routing with a bearing-guided cutter. A bit of faff this stage as you have to wind up and down the router cutter and flip the work piece half way through routing each curve, to avoid tear-out of the wood on the exit of the curve. The result is a perfect copy of the smooth curve of the template.
 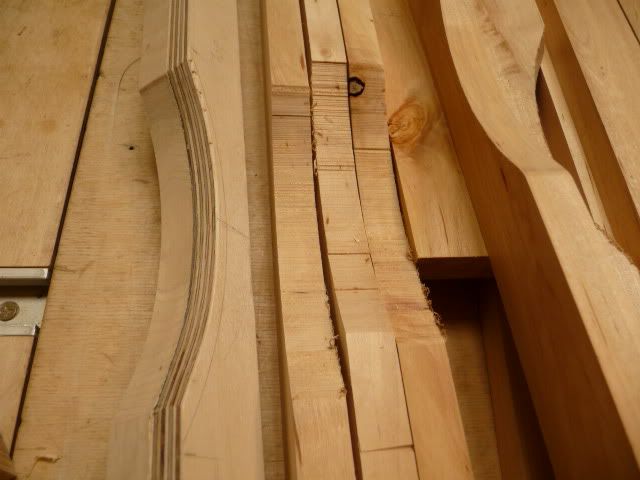 Finally I routed a recess on the back of each rail to provide a decent finger grip.
 It may be coming clear why you just can’t buy van units like this – I’d have to charge about five grand for the pair at this rate!! ------------- ECB 2006 SWB 174 window van
|
Posted By: nickhead
Date Posted: 18 May 10 at 20:20
|
looks excellent, top quality workmanship. its amazing what you can do with the right tools. i really want to sort myself out with a fully functional workshop this year, rather than a storage shed!! most of the stuff i do is on the road but its nice to have somewhere to build. |
Posted By: Ex-car bloke
Date Posted: 19 May 10 at 20:54
|
Thanks Nick! Yeah, having a fully equipped workshop (and our own sawmill!!) is very handy indeed! I do some site work but try to take jobs that are purely workshop-based - it always gets tricky working onsite, as you know...
I did some more on it today but forgot to take my camera so will update the blog after the weekend - I have a few days off first.
I'm right into the groove on the van project now though, I just want to get it finished.
Mrs ECB is organising our summer van trips as we speak and she has no idea how organised we're going to be with our lovely new cabinets - I'm making them in secret. No doubt I'll still get a bollocking for spending so much time on the van instead of on the house - trouble is she knows how much time it takes to make handbuilt furniture so if I say it was a three day job it won't wash!! ------------- ECB 2006 SWB 174 window van
|
Posted By: Ex-car bloke
Date Posted: 24 May 10 at 16:53
|
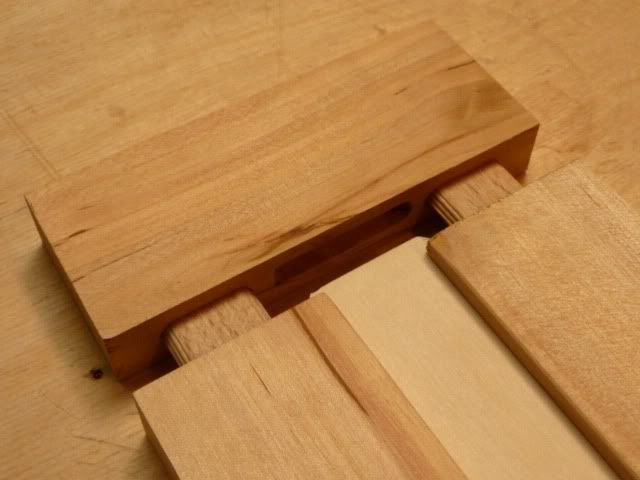
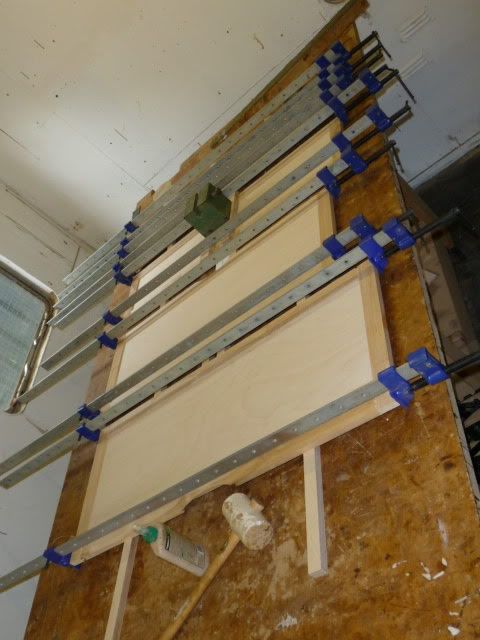
The next few stages were quite time consuming, involving a number of processes to the blank rails and stiles. The grooves are cut first, on the router table. The 6mm birch ply panels will locate in these. Next, I made the mortice and tenon joints which will be used to make strong joints so that the doors can take abuse without falling to bits. They’re actually floating tenons, so the 6 doors/drawers had to have 48 mortices cut for the 24 tenons.
I then sanded all the components – a boring job but necessary before construction as it’s impossible to do after this. After this I cut out all the 6mm ply panels and again sanded everything to 240 grit. 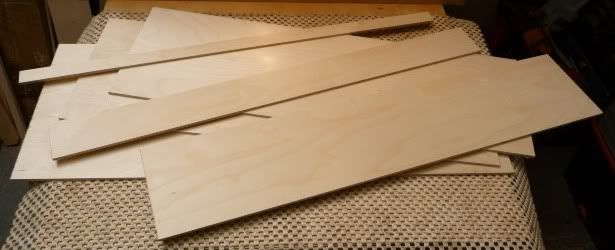 Each door/drawer-front is then fabricated dry, to make sure they all fit together okay, which they do (of course!) and all are marked and placed in sets.
The final stage is gluing and clamping.
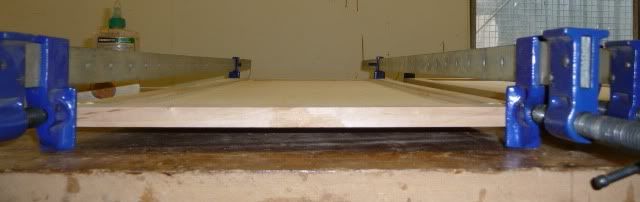
The important thing at this stage is to make sure the doors aren’t bent or twisted. With such long and lightweight doors it’s easy to do this. I had to weight one of them down (see pic above) as it was bent by the sash cramps. I also glued the panels into the grooves. This is not common practice for frame and panel doors but doing so means that the doors will hold their straight shape when dry, and also will guarantee that the panels don't vibrate in the frames when driving.
Lots of work involved, but the result will be doors that are both very light and very strong. ------------- ECB 2006 SWB 174 window van
|
Posted By: Ex-car bloke
Date Posted: 25 May 10 at 09:19
|
I couldn’t sleep last night so I was in at the workshop at 4.45am and two hours finishing the doors, de-clamping, sanding, de-gluing and generally tidying up. So now I have 5 of the 6 doors/drawer-fronts. They’re impressively light – birch is a hardwood but quite light, not just in colour. 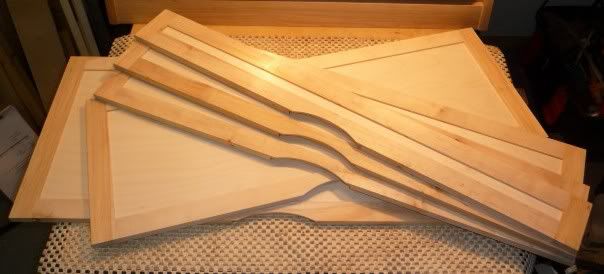  The remaining one is going to be a little trickier as it’s the door that folds down to become the table top, so the outside needs to look like the rest of the doors while the back (the table top side) is completely flush and smooth with no gaps where the rails meet the centre panel. That’s for another day. ------------- ECB 2006 SWB 174 window van
|
Posted By: BlackBeltBlakey
Date Posted: 25 May 10 at 09:32
|
No wonder van furniture costs so much to buy "off the shelf" !!
My kitchen pod took about 12 hours (unskilled) work in total. However my kitchen pod looks like it was put together by small martians with no opposable thumbs on speed, whereas your cabinets are going to look like they were built by a talented master craftsman!
As Darth Vader once said: "Impressive. Most impressive."
Blakey, who is slightly jealous. ------------- 2007 130PS SWB Pearl Black Kombi. My http://blakeysvan.blogspot.com/ - Van Blog . |
Posted By: Ex-car bloke
Date Posted: 26 May 10 at 16:54
|
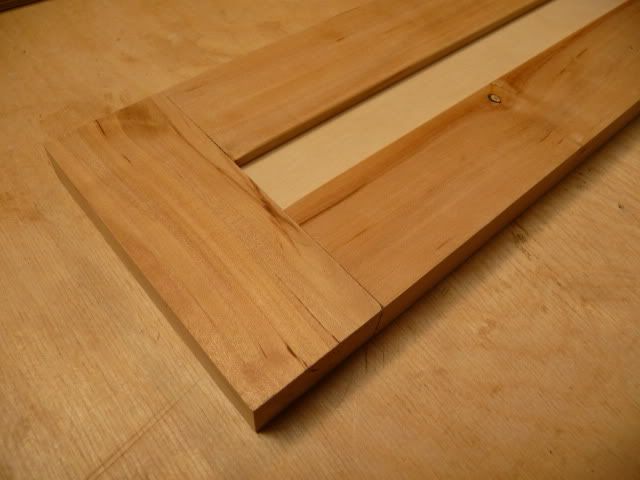
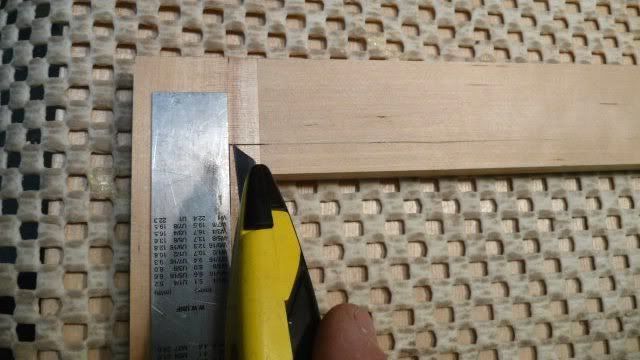
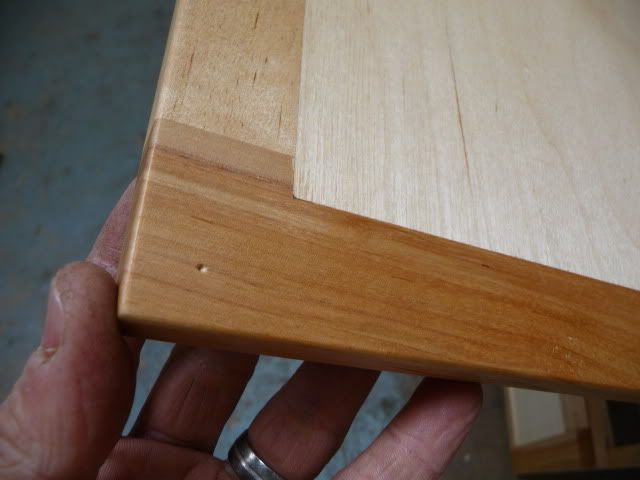
What did I say, “a little trickier”, this last door? What an understatement! I reckon this door alone will have taken about 15 hours to make or possibly more once it’s finished. I could have made the door many different ways but I really wanted it to look identical to the other doors from the front but completely flat and solid on the other side, since it will be folded down and used as a table, so I want it to be easy to clean with no raised edges or lips, just a smooth surface. This made it a bit of a challenge, as this whole project is turning out to be! The first thing to do was make the mortice slots in the edge of the door frame. These will hold in the centre panel, which will also have the same slots, and be held by loose tenons like in the door frame. The Festool Domino cutter is my favourite workshop tool. Its £800 price was paid for in the first job, it’s a truly amazing machine! 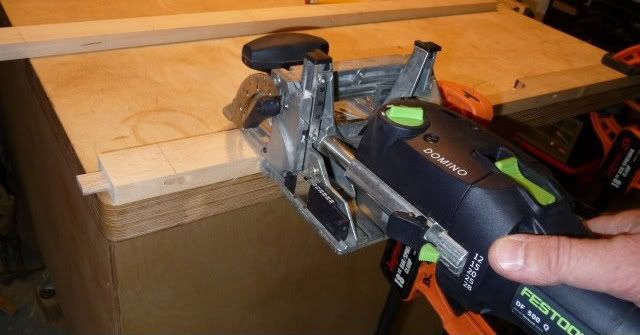 Next, I mark the edge which will have the rebate to take the 12mm ply panel, so that I know where I will need to make the square corners for the ply panel. These have to be with a knife not just pencil, in case the router cutter tears out the wood.
The four frame parts then have a rebate routed (remembering to stop two of them short of the ends!) and the corners squared off with a chisel. The tenons are now glued into the frame slots. 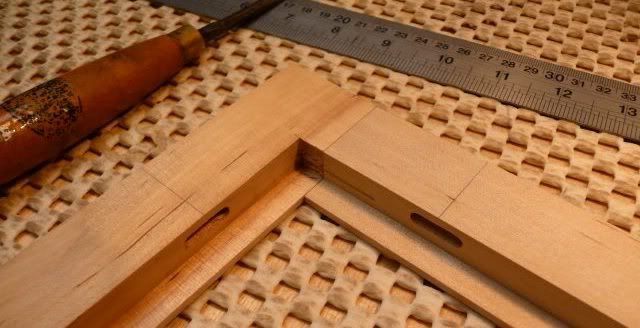 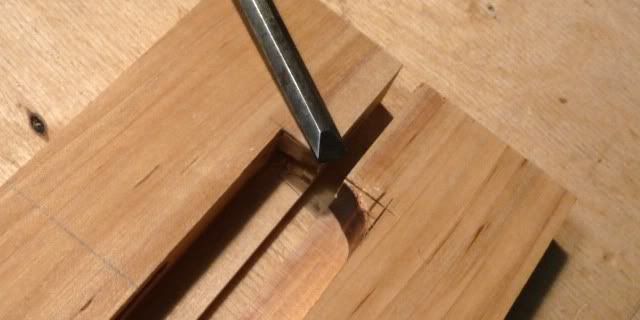 Now I cut the 12mm plywood to size. This bit is critical as even half a millimetre out will be seen as a gap when it’s all assembled. The ply panel is then given corresponding slots for fitting to the frame.
 The whole thing is dry fitted to make sure all is fine then it’s a clamptastic gluing session. So many sash cramps needed for such a small thing! 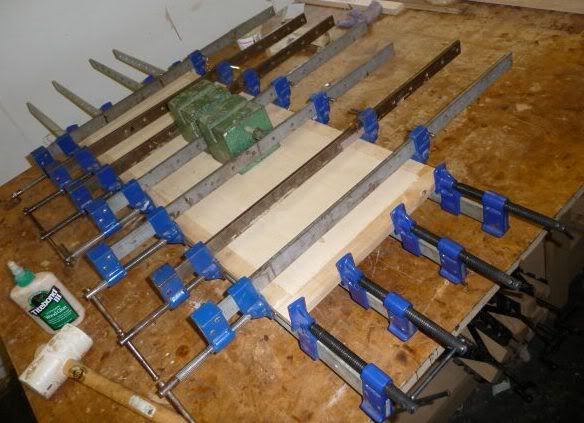 ------------- ECB 2006 SWB 174 window van
|
Posted By: Ex-car bloke
Date Posted: 28 May 10 at 19:45
|
Once the door was de-clamped it was another sanding session. The front side of the door looks like the rest of the doors:
While the rear side, the table top, looks like this (it's 12mm ply not 6mm like the others): 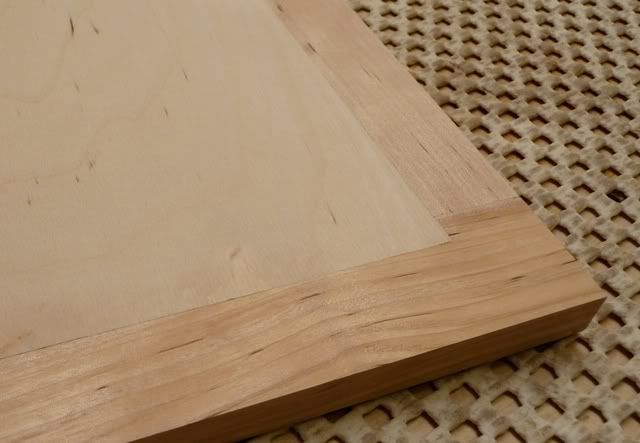 I’m really pleased with the fit of the panel. The joins are pretty much invisible so once it’s been varnished it will make a waterproof and hygienic worktop.  I also cleaned up and rounded the sharp edges on the inside of handle since it will be visible when the table is in the down position.
 Final job today was routing a radius to the left and right edges of each door/drawer front, then more fine-sanding. The end product is a full set of super-smooth finished doors which now just require hinges and recessed magnets to be fitted. 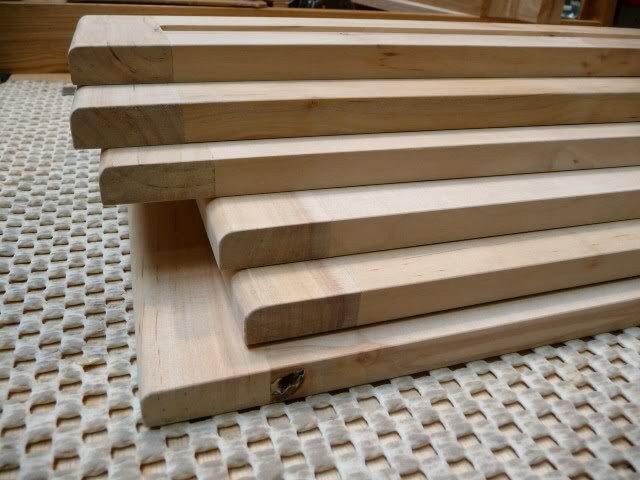 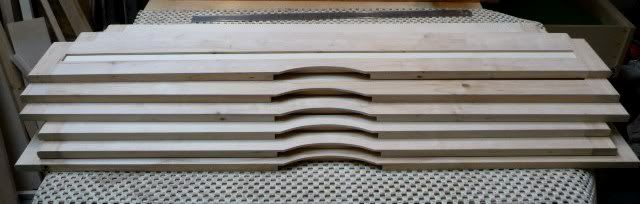 That’s really all the time consuming bit done now. You can see why mass produced van cabinets have flat ply doors edged with plastic beading – the time taken to make proper doors is considerable. However, I can see the light at the end of the tunnel now and want them all done for an imminent camping trip! ------------- ECB 2006 SWB 174 window van
|
Posted By: Dub4life
Date Posted: 28 May 10 at 22:22
|
Amazing job and very well thought out ECB. Makes great reading. ------------- Motexion, not cheap plywood! |
Posted By: Ex-car bloke
Date Posted: 29 May 10 at 16:03
|
Thanks for the positive comments Dub4life! Another few hours on it today, making drawers. I used 12mm birch ply for the carcasses and 9mm for the base with fully glued joints all round. A bit over engineered really but the reason is I want to be able to chuck any stuff in without fear of bending the base and also because the drawers are effectively winter storage boxes I want them to be robust. I fitted them together with biscuits, glue and screws. The base on a drawer is usually in a groove just above the base but I jointed it in right at the bottom so that I don’t lose any depth, which I would have done had I used the normal groove and panel method. Ended the day with more clamps yet again! 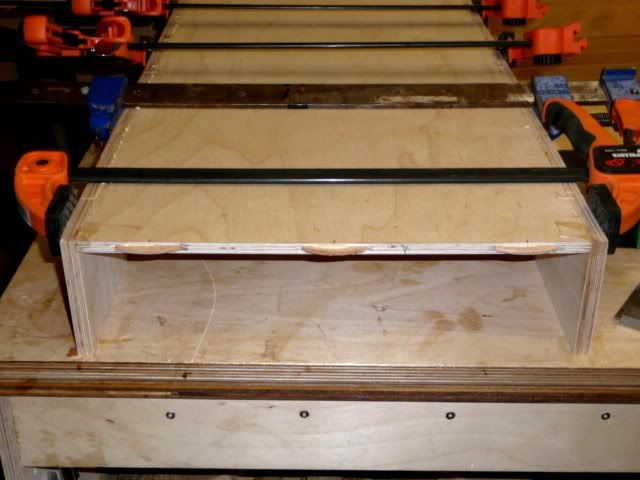 ------------- ECB 2006 SWB 174 window van
|
Posted By: Ex-car bloke
Date Posted: 31 May 10 at 16:57
|
A whole day on it today as I just want to get the thing finished now. Started the day wishing I’d used less glue for the drawers. Removing excess glue is a waste of time and getting the amount right is quite an art. My rush to get the drawers glued up before the weekend wasted me an hour and a half this morning.
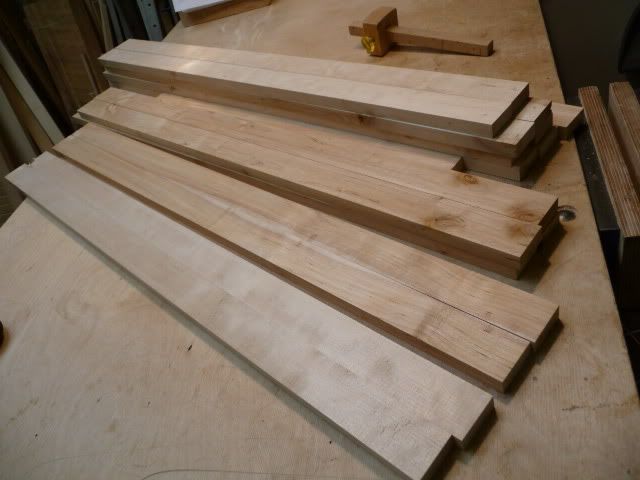
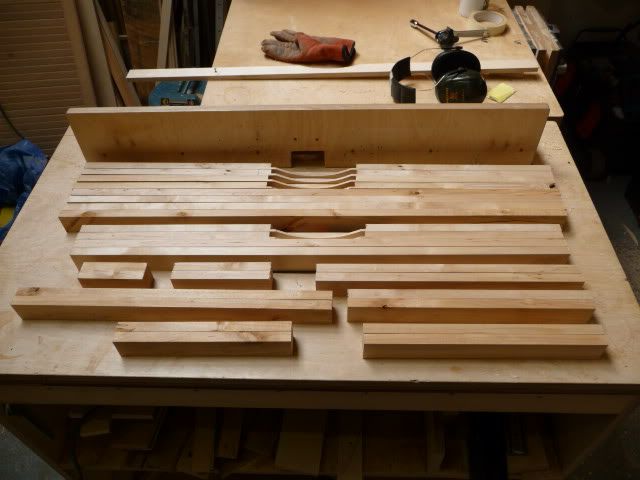
Anyway, lots of chiselling and sanding later, I had a pair of completed drawer carcasses. Note the grooves that I cut into the fronts and backs which will take divider blades to organise the contents better.  After this was a big session of measuring, cutting, machining and thicknessing then more cutting and a whole lot more sanding. The end product was a big pile of wood for the shelves and other ply panels, all the edging for the main cabinet carcasses and the thin rails that will divide the doors and strengthen the thin shelves.   The end panels of each cabinet then had their edging beads glued on. I used quick drying PU glue so I was able to get them in and out of the clamps and cleaned off and sanded, all in one day.    Final job of the day was machining a load of 12mm x 12mm section birch which I will use for the shelf supports and general construction. ------------- ECB 2006 SWB 174 window van
|
Posted By: Monza
Date Posted: 31 May 10 at 17:12
| Epic. Wish I had woodwork skills to make mine, I'm not putting my interior build on here now :P |
Posted By: Ex-car bloke
Date Posted: 02 Jun 10 at 14:39
|
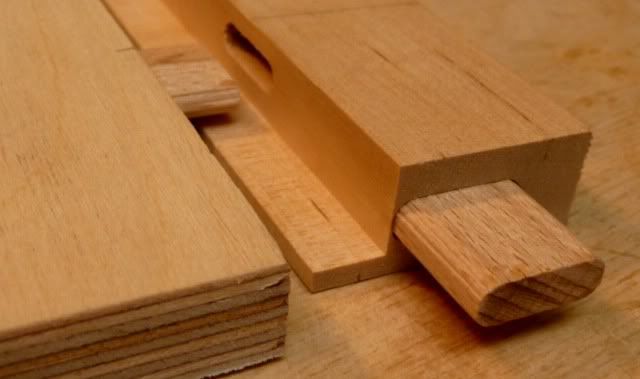
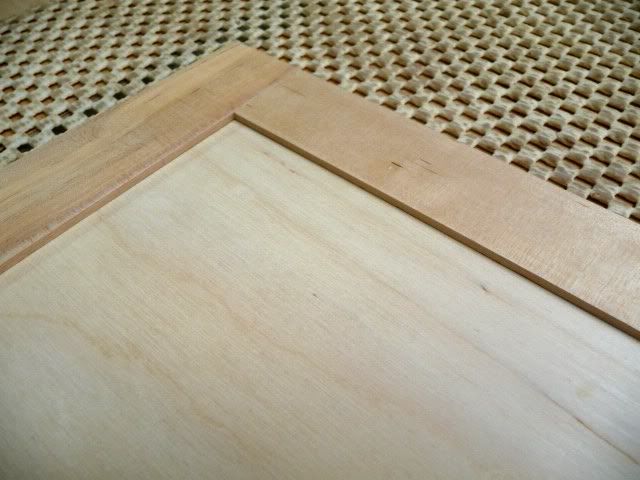
Next step was jointing the flat floor panel and the skirting panels to the vertical sides of each cabinet. I’m using biscuits for this, which when glued will give a neat, well-aligned joint which is also strong and space saving.
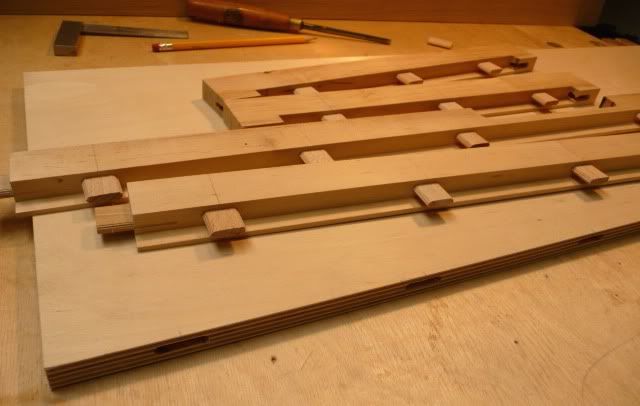
I used the same type of joint for all the shelf edge lippings. The shelves are just 9mm ply but these glued and biscuited lipped edges will make them more than strong enough while keeping the weight down.  I glued them together in pairs with sash cramps.  Once the glue was cured they were declamped and sanded, so now I have a full set of shelves ready for the main construction. Note that some of them have the lippings protruding outside the edges of the shelves. These are the ones that form the dividers between the doors/drawers on which I will fix the toggle locks.  The ends have a radius to match the left and right edges of the doors and all sharp edges have been bevelled. 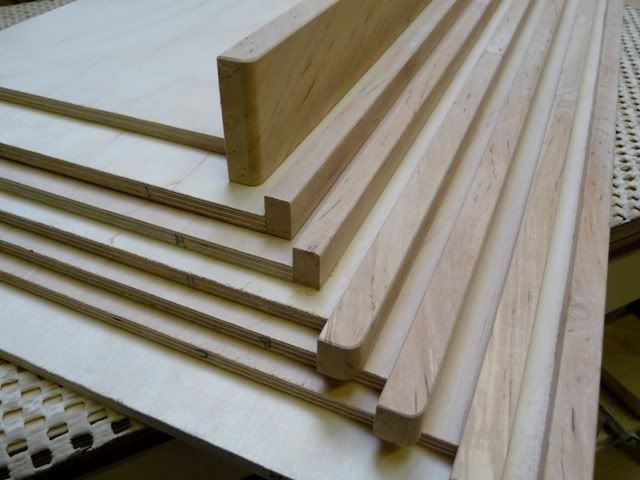 All components have now been made and sanded, so we’re getting close to the main construction part at last! ------------- ECB 2006 SWB 174 window van
|

Posted By: nickhead
Date Posted: 02 Jun 10 at 23:03
|
wicked stuff! im checking this daily makes me want to redo mine, i just dont have the time!! |
Posted By: Ex-car bloke
Date Posted: 03 Jun 10 at 09:44
|
Thanks for the feedback, Monza and Nick, good to know people are reading this!
Nick, I realised half way through that like you, I don't have the time to do this either, but it was a case of "I've started now, so..."
I posted it in a blog deliberately to put myself under pressure to get it completed. I'm serious, the missus is going to kill me when she realises the time I've put into this. She said, the other day, when I tentatively suggested we may have cabinets for our big September trip, "you are NOT spending time making van cabinets when we have [insert DIY jobs here] to do!"
The truth is I'm aiming to have it ready for our late June trip. We have a few camping trips planned this summer as well as the September France tour.
The thing is I'm a self employed furniture maker so this is all in my own unpaid time, but I've been sneaking out of bed at ridiculous o'clock and getting some serious early morning hours on it. I kind of figure "do it once, do it properly", trouble is it's the longest method of doing things!
I did a bit more on it this morning, details to follow. ------------- ECB 2006 SWB 174 window van
|
Posted By: Ex-car bloke
Date Posted: 03 Jun 10 at 16:52
|
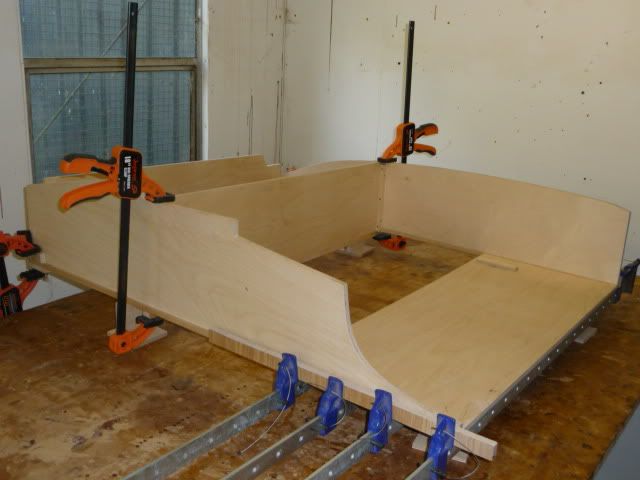
Now the exciting part – putting the first cabinet together! Actually it was slightly stressful as for the left hand (narrow) cabinet I hadn’t made a mock up so the front and rear shaped panels were done independently with an estimated vertical position. So, anyway, I dry clamped the carcass together and nervously put it in position....
...and it fitted perfectly! To be honest I need to slightly reshape the inside of the wheel arch curve as it doesn’t quite push right in hard against the van side at the bottom rear but we’re talking just about 5mm, so no problem really. While it's in the van in its dry-clamped stage I also mark up the dimensions of the shelf depths. None are square, they're all tapered, but I also want the rear edge of them to follow the shape of the window for example, so this bit was something of a fiddle with some tapers and steps involved. This is needed because the cabinets are backless and I don't want things to keep disappearing down the back of each shelf.
So after some marking and trimming of the shelves, I finally glue the thing up. You can see from all the clamps and angles why I chose to fit the shelves by screwing them into square section shelf supports – sometimes you can have so many overlapping clamps and cramps that glue-up is impossible, so this just made it easier.
I decided to use 9mm ply for the deep skirting panel to save weight. The snag with this is that thin ply in long sections usually has some bend in it so I braced it at the bottom and top with birch lippings which I glued using a solid straight edge alongside it to make sure both edges were straight. Once glued and cured they will stay straight and be very strong. 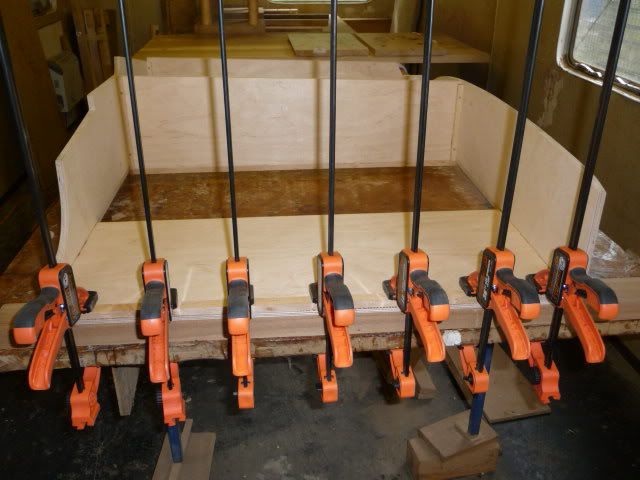  I must say I’m well pleased with how light the cabinet feels. Almost as pleased as the fact that it actually fits the van! A bit of a break now as I have to get some paid work done......!!! ------------- ECB 2006 SWB 174 window van
|
Posted By: blackvanman
Date Posted: 05 Jun 10 at 22:49
awesome ecb! i'll give u £200 cash to make the same for me!
------------- '09' 174 kombi, swb, pearl black |
Posted By: fastfilli
Date Posted: 05 Jun 10 at 23:19
This is a great post ! best on the site  I am reading with awe. This is very similar to what I am planning for my sportline kombi but I want both side's like your left side, so I loose no room in the back for my Motocross bike I am reading with awe. This is very similar to what I am planning for my sportline kombi but I want both side's like your left side, so I loose no room in the back for my Motocross bike  . .
I am going to give it a go at making the cupboards myself  some tips on what materials to use would be good I was just planing on using regular ply wood from the local building merchants ? some tips on what materials to use would be good I was just planing on using regular ply wood from the local building merchants ?
|
Posted By: Ex-car bloke
Date Posted: 06 Jun 10 at 16:47
|
Thanks for the feedback, chaps! Blackvanman, £200, you cheeky bugger, I'll sell you one template for £199! fastfilli, regular exterior ply would be fine although it varies in quality hugely. Some of the cheaper Chinese stuff has very thin top veneers, very soft mid layers, it breaks out like buggery when you cut it, the general quality can be poor and it can be quite twisted.
Best would be Voringher ply (which is superlight - willow wood I think - and strong) but at £150+ a sheet retail price, very expensive.
12mm and 9mm birch ply is what I'd recommend. It's amply strong enough and the weight penalty compared to Voringher is not much. Try to get Scandinavian birch ply as it seems to come in decent top veneer thickness. The other reason for birch is that it just looks nice, the light colour (with a clear finish) is better for a van interior in my opinion but most importantly it can be accurately cut and sanded to a very good finish. Retail sheet price for 12mm sheet should be less than £50. I pay about £20 trade from Lathams.
For framing you could save loads of time and cost by using thin section softwood, this would be perfectly adequate although every piece of framing steals valuable space so make it as thin as you can get away with - this is why I've used 12mm x 12mm shelf supports.
Also you could use solid ply panels for the doors. This would save you loads of time and be fine for the job although at a weight penalty over frame and panel ones, and also plain ply doors (even in good quality birch ply) may have slight bends and twists that can't be removed although they could be held flat by double catches on the cabinet. Also you'd see the ply edges on the doors but it's actually not an unattractive thing to be honest, in fact I sometimes wonder why I've been such a smart-arse to spend so many hours on framed doors when ply doors would be fine! ------------- ECB 2006 SWB 174 window van
|
Posted By: fastfilli
Date Posted: 06 Jun 10 at 19:36
|
Cheers dude its been a great help ! I have been playing on Google sketchup all afternoon Ha I love it But my Mrs not happy that I am still on the computer LOL. Not sure now if I should use doors or just shelves. humm I like the idea of no moving parts (nothing to rattle) But I like the idea of doors (nothing will fall out)
|
Posted By: BlackBeltBlakey
Date Posted: 07 Jun 10 at 08:42
|
One question ECB: How are you going to attach the cabinets to the walls of the van in an easy to remove manner? ------------- 2007 130PS SWB Pearl Black Kombi. My http://blakeysvan.blogspot.com/ - Van Blog . |
Posted By: Ex-car bloke
Date Posted: 08 Jun 10 at 17:00
|
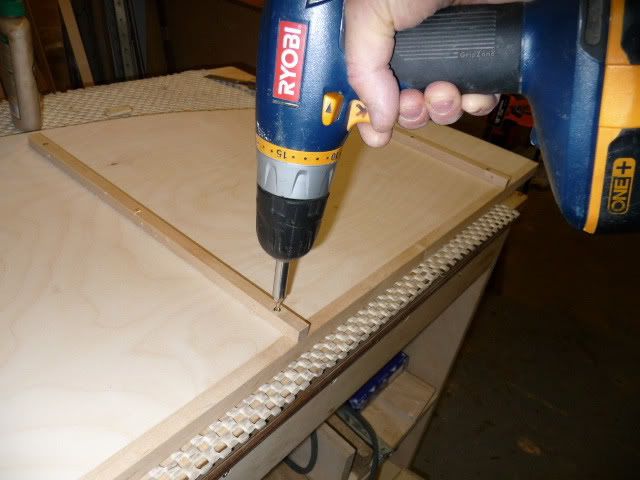
Never mind the paid work, I want to get my van cabinets finished! Blakey, not sure yet is the quick answer. Will keep you posted on this thread. So the narrow cabinet is finished now bar fitting doors and applying the clear coating and carpeting the shelves. Oh, and the fitting of folding hooks and Velcro straps to the front and rear faces for hanging stuff..... The wide cabinet has moved on a lot. The floor and front lower panel were biscuited together, glued and clamped, to make an L-shape single piece. 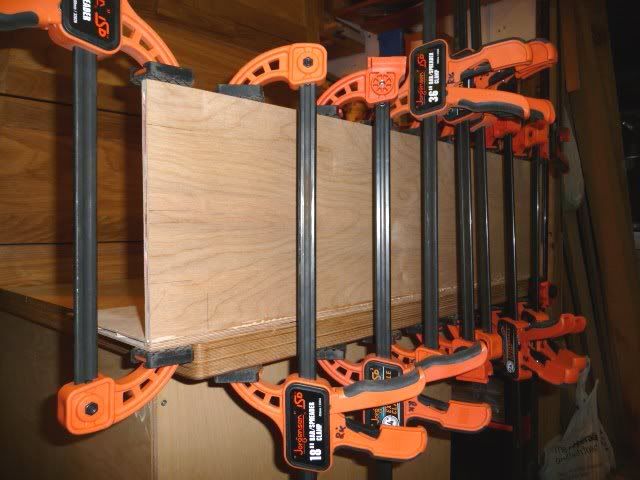 Next I screwed in the shelf supports, which are also glued.
 Next job was gluing-in the L-shape at the bottom.
 The final assembly of the shelves in the carcass involved lots of clamps while screwing and gluing the shelves to the supports, but I think you’ve probably all had enough pictures of clamping up...
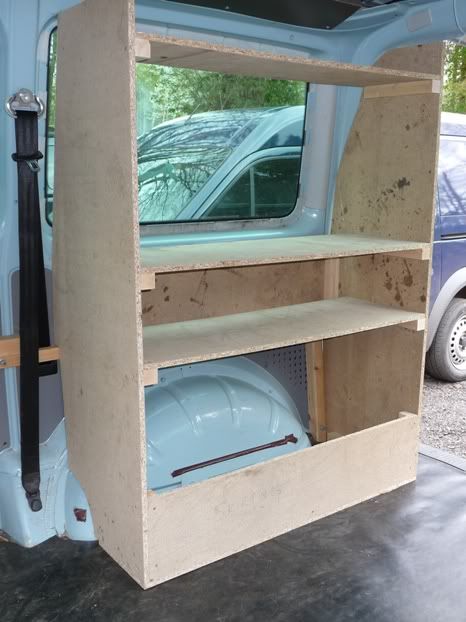
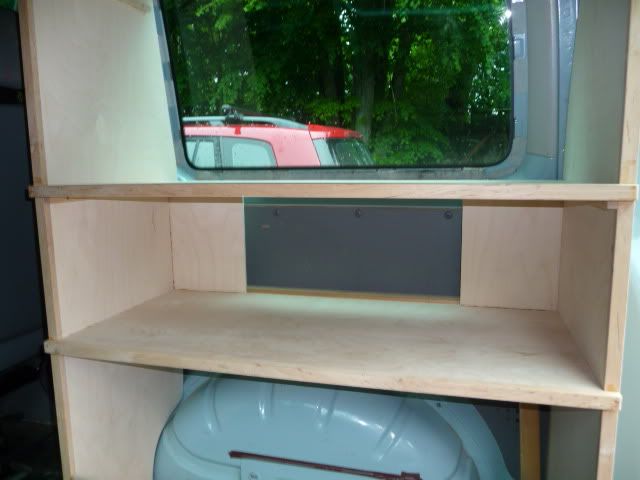
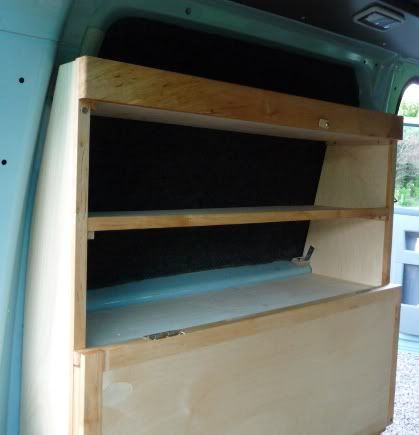
Shelf 1 and 2 (which make up the drawer box) are fitted then once the glue was dry I moved it into the van for the first time and find that all my prep work has paid off as it fits perfectly. Phew! 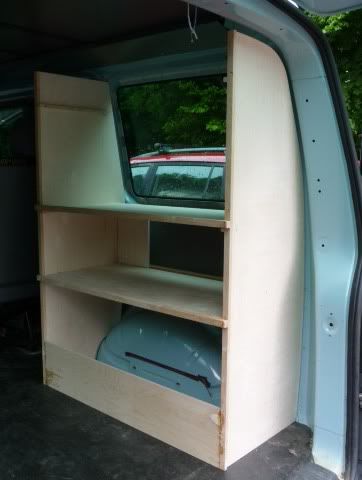 You can see here where I’ve placed the shelf above the drawers, right on the window line so I can use the maximum depth for the storage shelf and not have space wasted behind the drawer box. The depth to the window is about 500mm – excellent storage space.
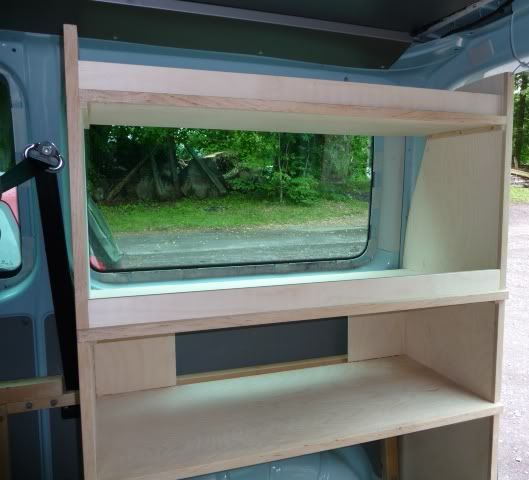
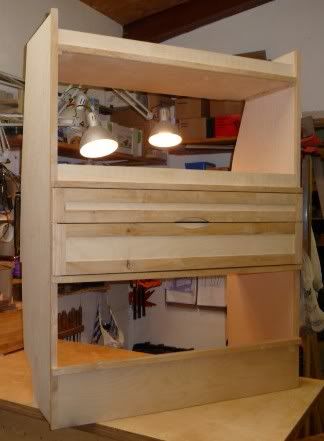
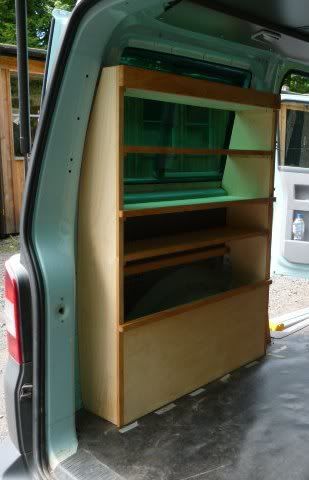
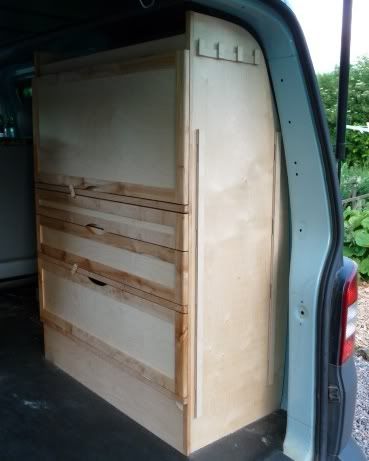
 The top shelf is tapered so I left it out until this stage to make the measuring of the taper much easier. Once trimmed, I glued in this shelf too. Next stage was loads more cleaning and sanding to remove all glue residue. Final job today was fitting the small “upstands” at the fronts of shelf 2 and 3. The difference in rigidity that these 60mm tall 12mm ply sections make to the previously bendy shelf is amazing. Clamped, glued and screwed in, they will allow me to carry really heavy stuff on these shelves if need be and also help keep the whole cabinet square (lightweight cabinets like this tend to easily parallelogram like IKEA furniture if you don’t brace them enough). Then a final quick fit to the van to see how the top shelf looks. You can see here the position of the vertical sides in relation to the van sides. The rear one was really tricky to get the curve right on as the van side curves into the centre and also curves in towards the front at the same time. The front vertical sits just behind the seat belt anchor and leaves loads of good storage space between it and the back of the double rear seat. Remember the whole concept of this storage is that I will be camping in future with the rear seat in place.
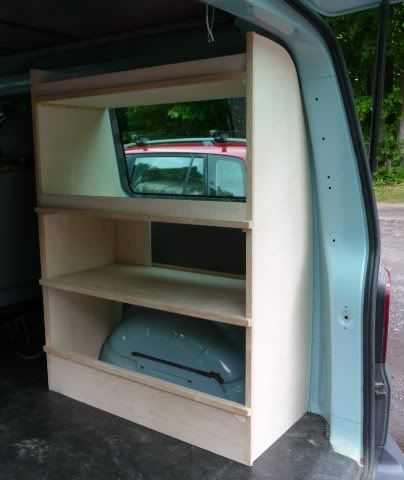  This is the back view of the cabinet. The drawer box braces are just 6mm for lightness but glued and screwed in, making the cabinet really rigid. 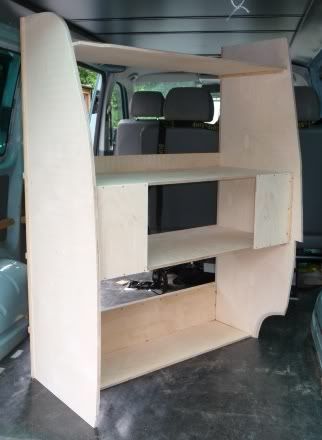 I feel like we’re nearly there but in reality there’s still lots to do. ------------- ECB 2006 SWB 174 window van
|
Posted By: nickhead
Date Posted: 08 Jun 10 at 22:23
|
is there a back going on it? to protect the glass/keep the stuff hidden from the outside? looking really nice tho! |
Posted By: Ex-car bloke
Date Posted: 09 Jun 10 at 11:32
|
Good question, Nick.
Definitely no back, there's no way I could make a back that was perfectly shaped to the curved van sides but in any event a back would just waste space and add weight.
I'm debating this one. Currently I have stick-on velcro blackout blinds which would do but not offer protection to the glass. I could make a more padded versions of these, that's one option.
Another is to get thin ply, painted black on one side and carpeted on the inside, held to the window frames with rare earth magnets glued into the edges - it would look a lot neater on the outside. I'll do some R & D on this one! ------------- ECB 2006 SWB 174 window van
|
Posted By: Big-AL
Date Posted: 09 Jun 10 at 13:47
Your so slow ECB !! We knocked my Plywood cabinets up in a day , and painted them matt black 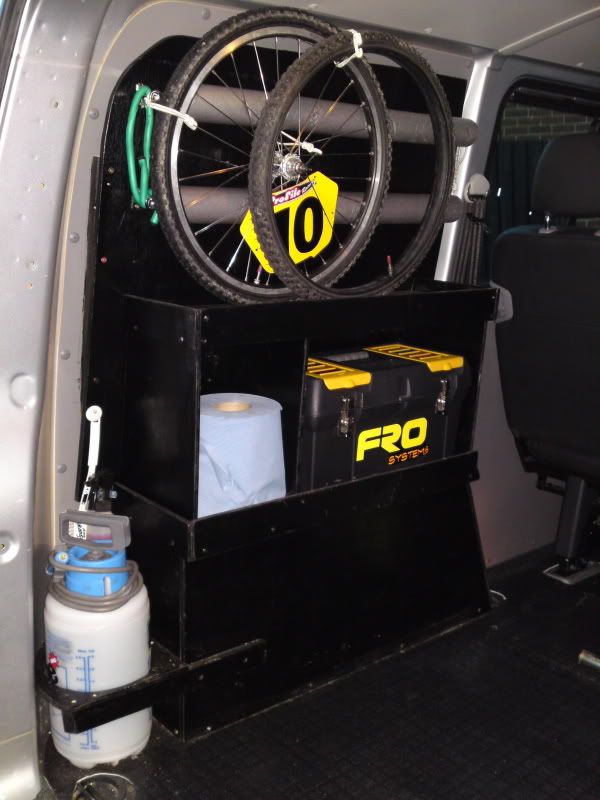 Do you want me to pop round with my , my drill and metal clips and help you finish them, off ??
All joking apart they look very smart ------------- "Big-AL doesn't do spelling, but if he did, he would rpobalbe be the best in the world" 2007 Kombi 130 Sportline Alan Ranger www.rangersgarage.co.uk 01980 655555 |
Posted By: Ex-car bloke
Date Posted: 09 Jun 10 at 17:07
|
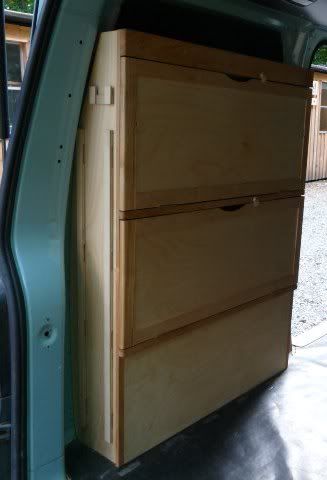
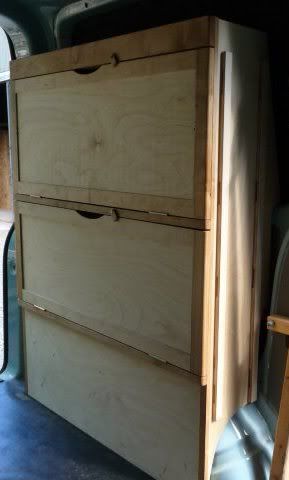
Al, your excellent little shelving units inspired me to do mine, I just got a bit carried away! I just did a couple of quick jobs today. The drawer fronts were fitted to the carcasses and the runners fitted to the cabinet. 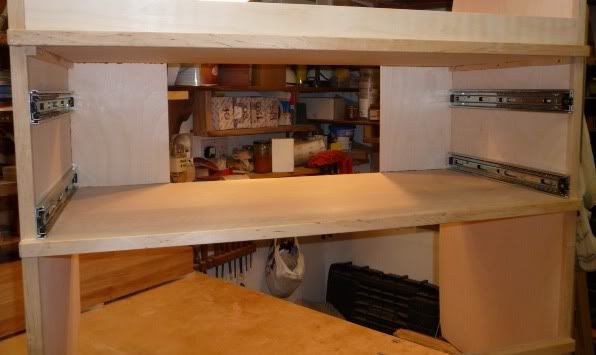 It was a bit fiddly as the runners don’t adjust very much so there’s lots of measuring and making of slight adjustments until they fit perfectly. I made the gaps between drawers 3mm to give myself a better chance of having it all looking consistent. Usually this gap is a lot less - often 1mm - which is too challenging for van furniture. 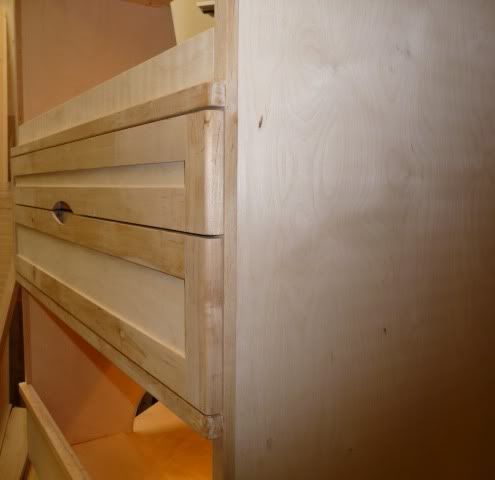 I had to rebate the top edge of the drawer sides to clear the shelf support. It was only just rubbing but I routed a couple of mm off to be sure. 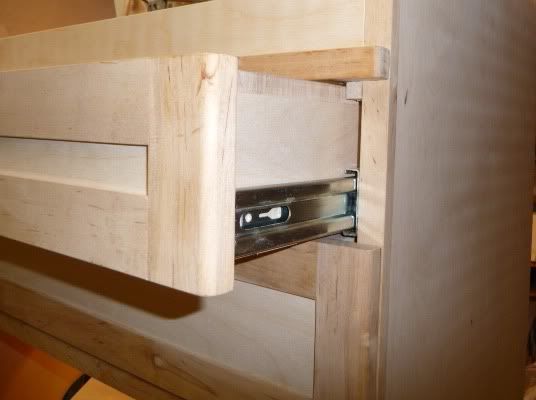 These runners are way over-engineered for the job. They will take 45kg per pair!! All full extension runners are heavy – soft close ones are much heavier than these – so I went for these because they stole less drawer space than other designs – just 12mm down each side and nothing from the depth. I could have got slightly lighter duty runners but I love the solid feel and smooth action of the heavier type. You can see from the back how little wasted space there is. 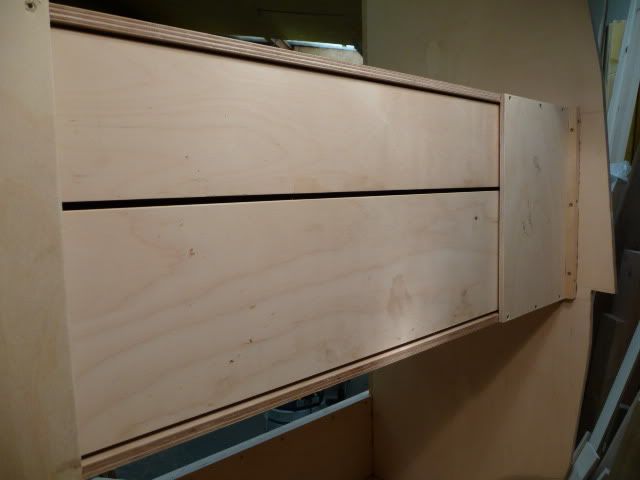 The drawer runner length was actually the starting point for the whole design, so I just had to decide whether I went for 350, 400 or 450mm runners. I ended up with 400mm.
The full extension is just that, so it allows for the drawer dividers to be removed and refitted without taking out the drawer. They’re quick-release anyway so easy to remove when needed. 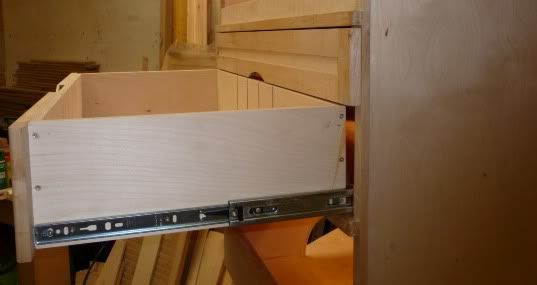 Like, for example, when lifting the cabinet into the van! With the drawers and especially the runners now fitted, the weight of the cabinet is spiralling slowly upward, but the penalty will be worth it for the versatility of having deep full extension drawers, which will be a real benefit for camping. The way I figure it is, the weight of a compressor fridge and a Calor gas bottle (of which we have neither) is much more than the extra weight of my cabinet over lighter ones, so it’s all relative, and I’m only carrying mine around when on holiday, not the whole time.
 You can really start to see how the end appearance will look, with the drawers in place. It’s giving me motivation to get the job finished. ------------- ECB 2006 SWB 174 window van
|
Posted By: Ex-car bloke
Date Posted: 16 Jun 10 at 11:26
|
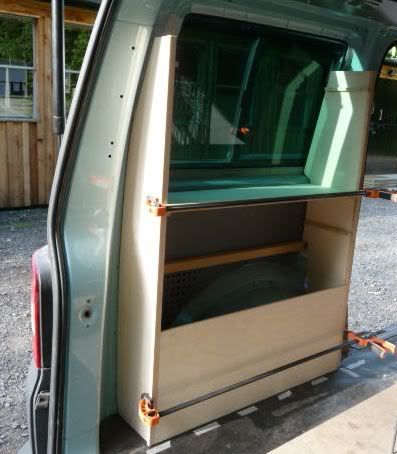
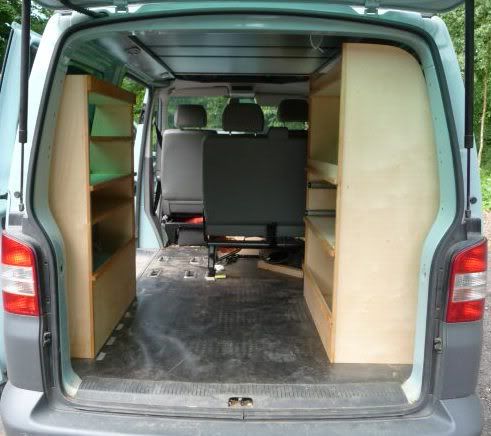
I had a sudden realisation that I have to make a living, so I’ve been busy for a few days... Still, I have a little progress to report. Final sanding everything to 320 grit (smooth-as-a-baby’s-botty smooth) was followed by application of the first of two coats of satin Osmo Polyx Oil, a product designed for floors and loved by furniture makers because you can apply it with a cloth like a polish so dusty air is no problem. The birch is transformed, taking on a lovely pearlescent appearance. The accentuated contrast between the lighter birch ply and the darker Scottish birch is really nice too.  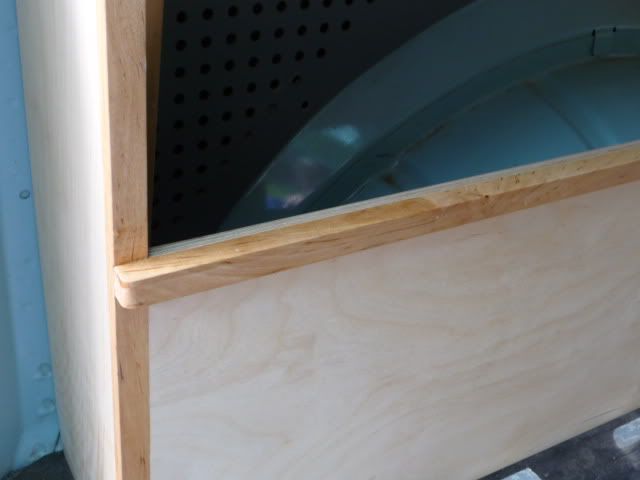 I also had both cabinets in the van together for the first time. A quick measurement check to make sure both front faces are vertical confirmed that all my ball-aching work at the start has paid off again as all is parallel as it should be.
You can see from this shot that the narrow cabinet doesn’t hinder access via the side door at all so even with the rear double seat in place coming and going will be no problem.
The space between them is a good compromise, I think, between huge storage volume combined with enough room to get turned round, do some cooking on the fold-down worktop and get into the fully-extended drawers. 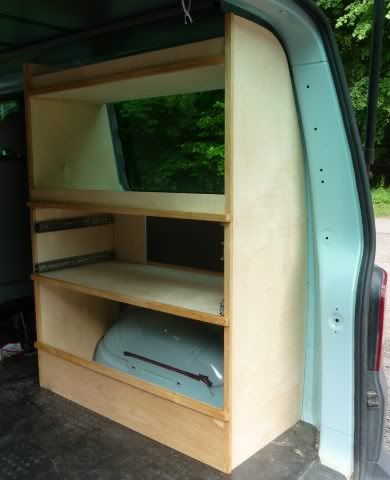 ------------- ECB 2006 SWB 174 window van
|
Posted By: Mr Hedgehog
Date Posted: 17 Jun 10 at 21:20
|
Fantasic work ECB ------------- Jumped Ship to a Vito but I hear a 2021 T6 calling, only real difference is the Vito cab is more car like. |
Posted By: nickhead
Date Posted: 18 Jun 10 at 18:39
| thumbs up from me! |
Posted By: Ex-car bloke
Date Posted: 21 Jun 10 at 11:28
|
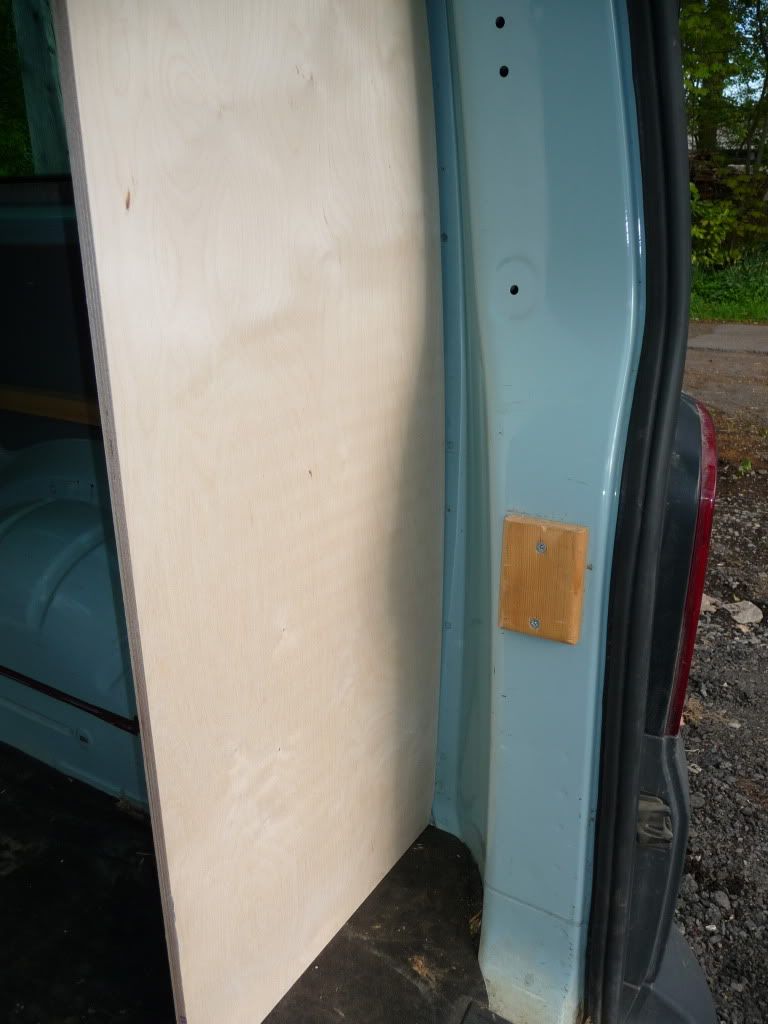
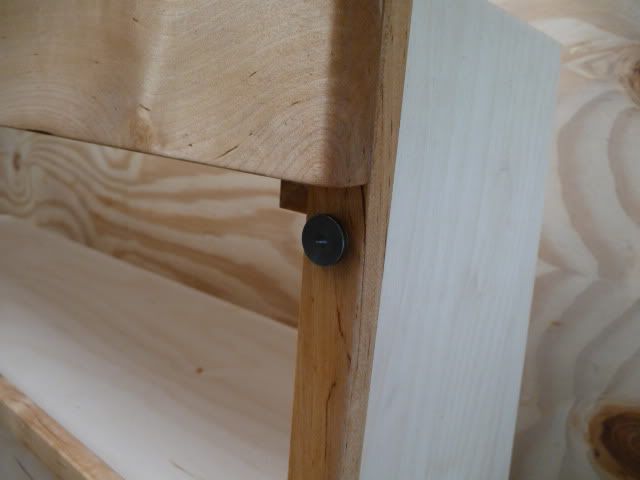
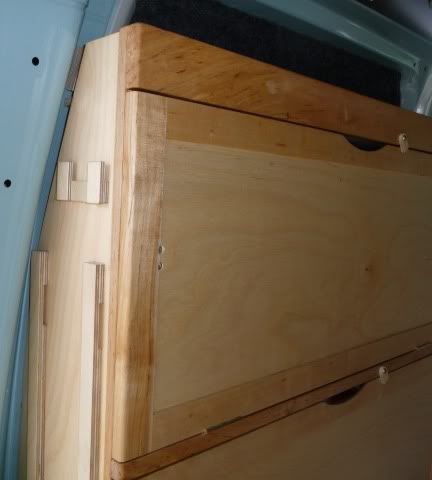
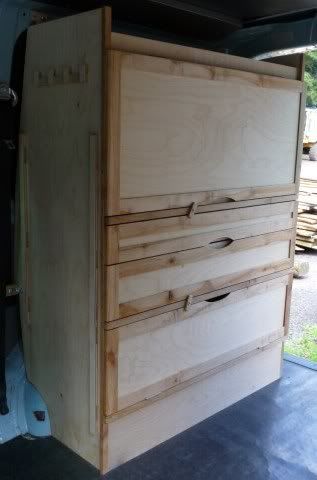
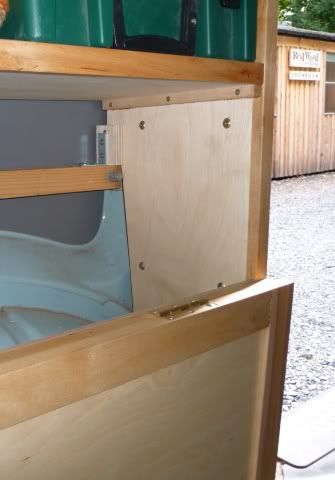
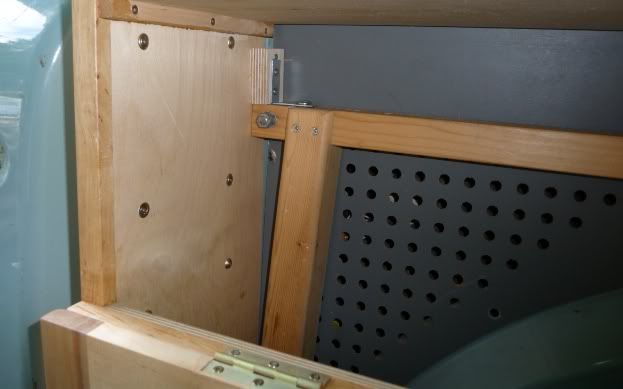
This next short section should be avoided of you are a vanorak of a nervous disposition or get anxious about unsightly holes, fixings or specks of dust on your beloved T5 interior. I know the proper advice here is “use nutserts/rivnuts”, but I don’t want to spend the money on the rivnut applicator, I have unsuccessfully tried to fix them in using a manual method and when you see the other wooden framework in my van and its general agricultural state inside, you will understand why, after some agonising, I went for a fixing method that is simple and robust but not cosmetically beautiful. So basically I screwed to the van metalwork small plywood blocks to two points as high up each cabinet as possible, to which they are attached via M6 allen-head bolts. I will replace these with M6 plastic knobs in due course. It’s crude but effective, I guess, and when the cabinets are in you can’t really see the fixing points. I might round off the sharp edges and clean them up a bit but the main thing is the cabinets are well fixed. 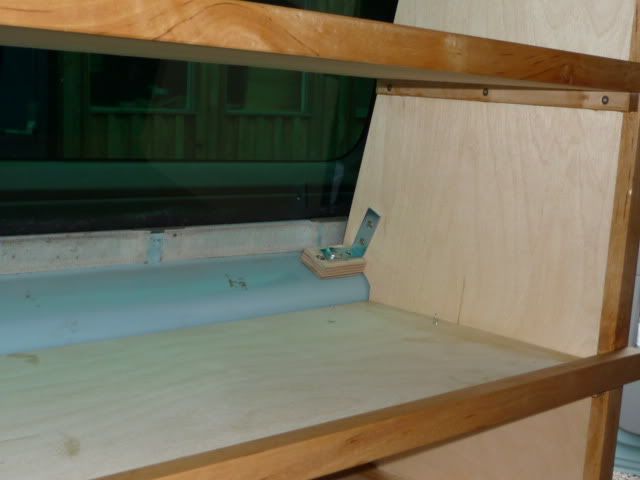 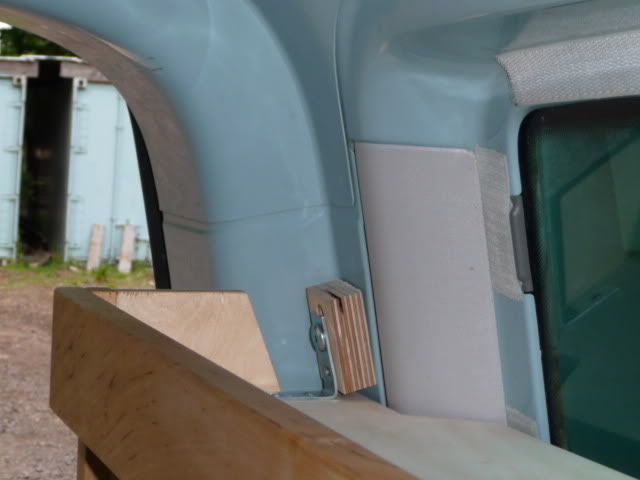 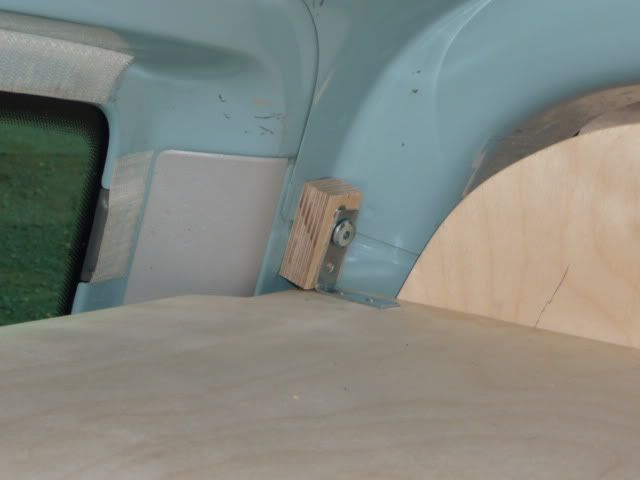 Now we resume the stricter quality control... Next job, door fitting. First I rebated the door edges so that the solid brass hinges sit snugly in place then fix them to the cabinet. 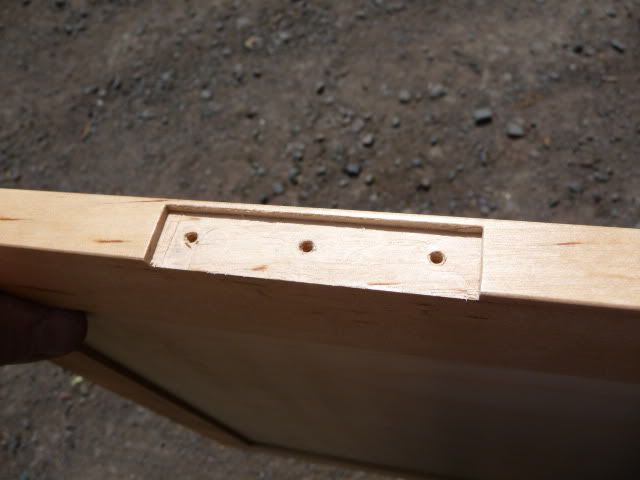 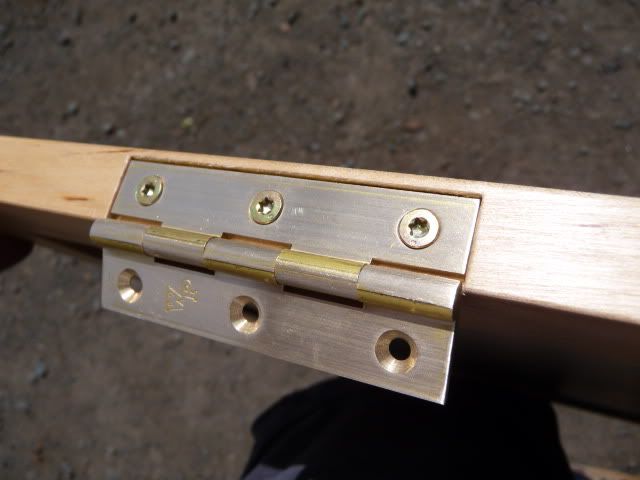 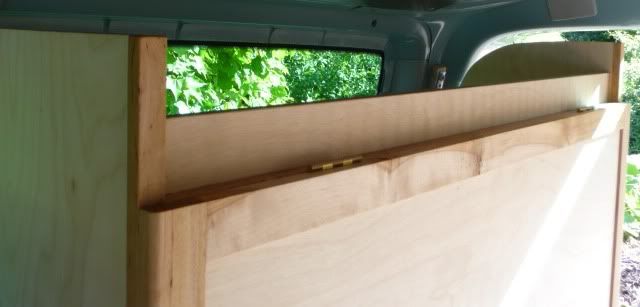 Then the rare-earth magnets are fitted. I drilled the 10mm hole in the cabinet frame first and used a dowel marker to locate the corresponding magnet in the door. Magnets are fitted flush (the one in the photo had to be shimmed out by about 1mm) which is important as they need to close directly onto each other with a satisfying “clack” which provides a rattle free fixing. Make sure you get them the right way round or you end up with a door that will never close!
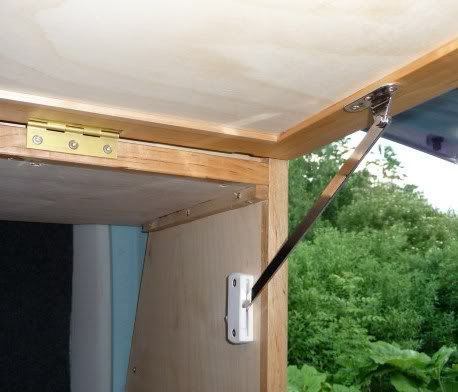
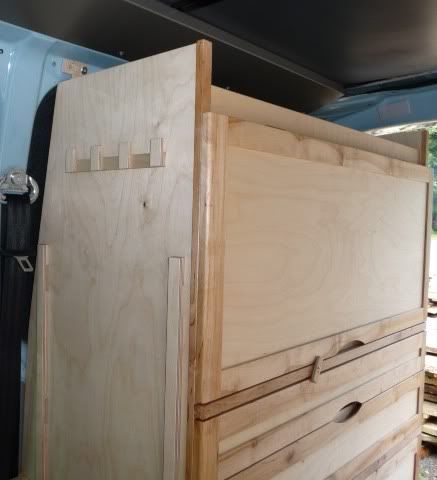
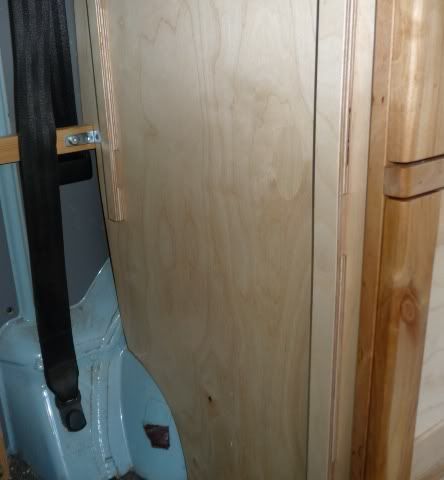
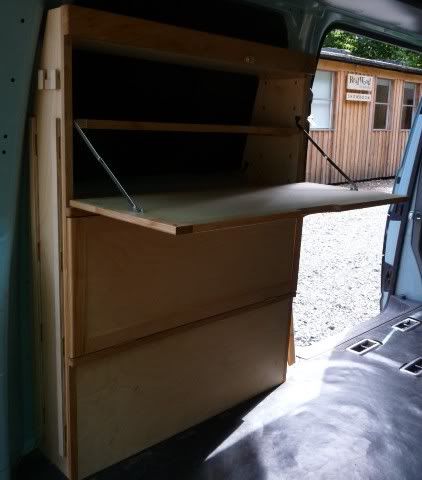
I made the little turn-buttons next. These are pieces of 6mm birch ply and just provide a safety catch, really. The magnets hold the doors shut very effectively but in the event of, say, driving down a deeply rutted track, the contents of the cabinet could push open the door. Compared to more sophisticated, ugly and/or heavy catches and latches, I’m really pleased with these low-profile wooden ones. There are single ones on the narrow cabinet and double ones on the wide one, to hold the drawers in too. The drawers have a positive “click” at their closing point so again there is no strain on these buttons most of the time, and no rattling. 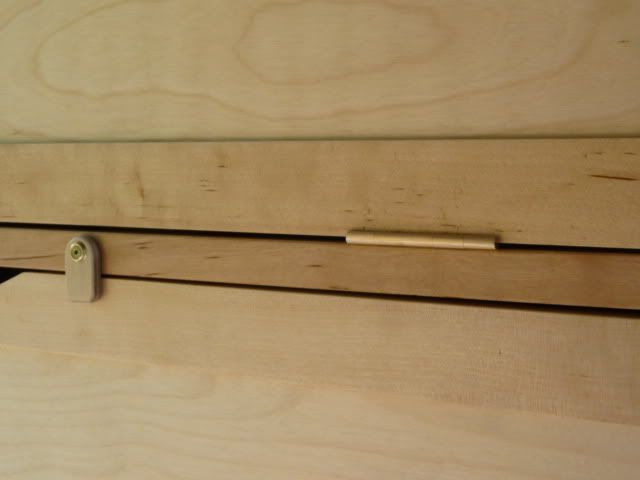  So, for the exciting bit....fitting the almost-completed cabinets into the van and taking them on their first trip, home to show Mrs ECB! She loved them and was so impressed that she forgot to give me a bollocking for spending so much unpaid time working on them! So, some photos of the now almost-done job: 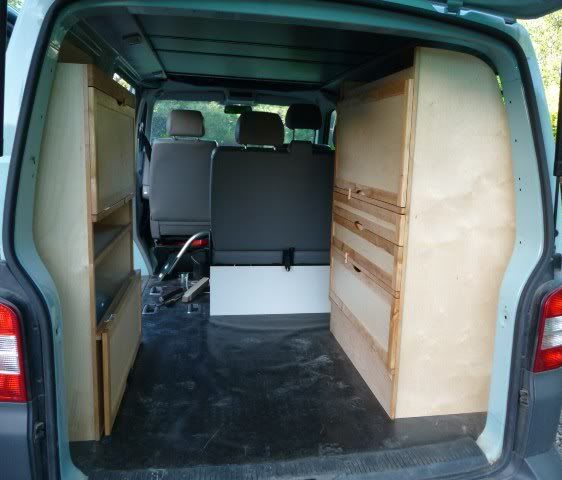 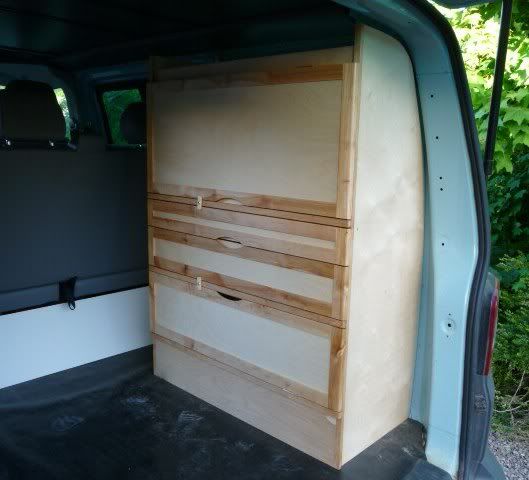 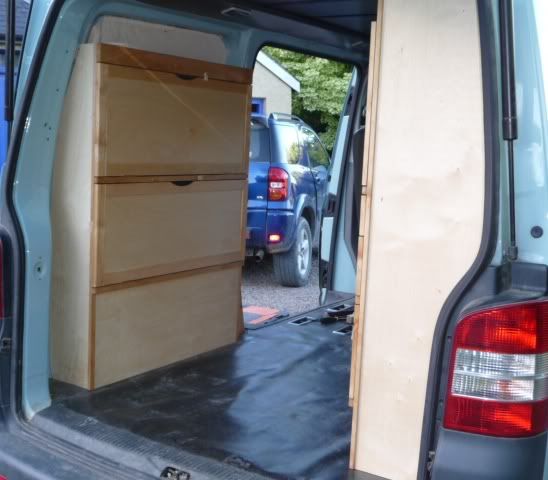 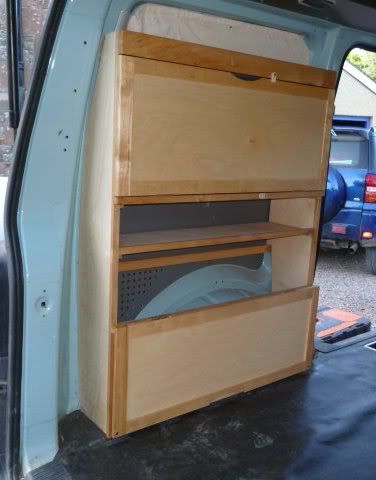 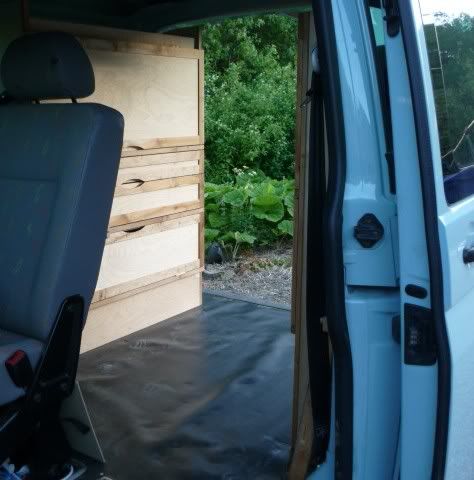 I’m very pleased with them, I have to say. The lightness of colour is going to be easy to live with and looks great with the light blue of the van. I’m also pleased by the lack of rattles or squeaks. It all feels quite solid. The access around them and for opening and closing door and drawers is, in the end, a good compromise over storage volume I think. Most of all though I’m just excited by the practicalities that they will bring. I reckon in summer time I’ll keep them loaded up most of the time so that we can nip away at short notice for a night or two away. On longer trips (like the ones we have planned in August and September) it’ll just be brilliant to be able to find anything I need quickly, and to not be forever tripping over bags and plastic boxes. The narrow left hand cabinet will probably stay in year round, as it takes up as much space effectively as a box around a wheel arch. However, quite a few jobs still remain, which I hope to get done quite soon: 1. Finish fixing the magnets to the wide cabinet. 2. Fit the metal stays to the lifting door and the fold-down door/table top. 3. Fit the Megavanmats carpet to all horizontal surfaces. 4. Make window blinds out of the same carpet and figure a neat way of fixing them to the metal window frames. 5. Make and fit the drawer dividers. 6. Apply another coat of Osmo to the carcasses. 7. Make and fit birch ply low-profile coat hooks to the cabinet ends. 8. Make and fit thin vertical low-profile rails on the cabinet ends to allow Velcro straps to be threaded through for holding coats and other stuff hung on the ends. 9. Have a holiday! I’ll keep you posted on all nine tasks... ------------- ECB 2006 SWB 174 window van
|


Posted By: Titus A Duxass
Date Posted: 21 Jun 10 at 11:45
|
"The birch is transformed, taking on a
lovely pearlescent appearance. The accentuated
contrast between the lighter birch ply and the darker Scottish birch is
really nice too. " I love when you talk dirty. ------------- Bollocks to it all!! 51°24′N 12°52′E |
Posted By: Ex-car bloke
Date Posted: 21 Jun 10 at 21:22
|
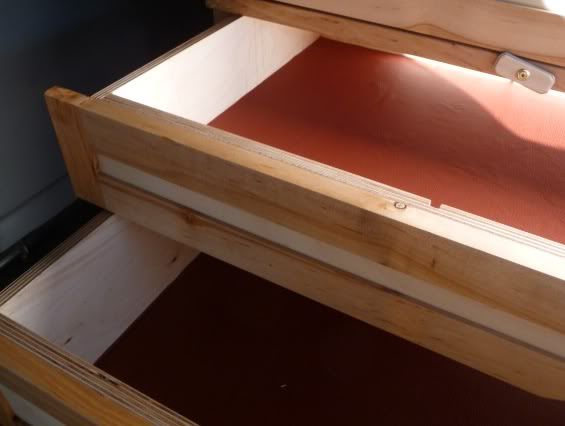
Talking of waxing lyrical, I found a lovely piece of thick tan leather today in the workshop, left over from an old upholstery job. So now I have leather lined drawers, how terribly decadent! Much more practical than the lining carpet I'd planned to use, and the smell that wafts up when you slide the drawer open is just fantastic!Just don't get me started about how pleasant it feels to stroke my silky smooth bottoms....
 ------------- ECB 2006 SWB 174 window van
|
Posted By: Ian156
Date Posted: 21 Jun 10 at 22:35
|
They are going to last longer than the van ------------- Brian Vantana. 60% of the time it works everytime! 2012 Subaru Impreza with a roof rack and tinted windows 2006 Rio Kia5 1.6 with heated seats and a remote start. |
Posted By: BlackBeltBlakey
Date Posted: 25 Jun 10 at 11:52
So to attach your cabinets you effectively now just use an allen key? Are you just attaching them at two points, basically at window level? Nothing at floor level at all?
I'm asking because my kitchen pod is still bungeed into the van and I've been wracking my brains for a way to attach them and hence have been waiting on your solution with baited breath!
Cheers Blakey ------------- 2007 130PS SWB Pearl Black Kombi. My http://blakeysvan.blogspot.com/ - Van Blog . |
 Ex-car bloke wrote:
Posted By: Dub4life
Date Posted: 25 Jun 10 at 14:04
just like my porn draw! here's mine I did 3 years ago, no rattles either. Built one on either side at the same depth, bottom bit opens a hinged door to wheel arch where I keep the Jack and Jump leads. 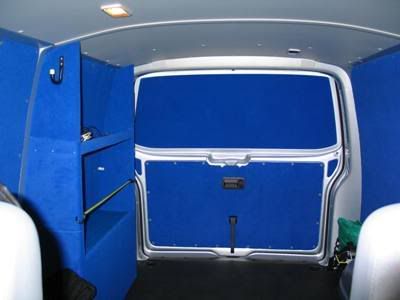 ------------- Motexion, not cheap plywood! |
Posted By: Ex-car bloke
Date Posted: 28 Jun 10 at 17:14
Just an allen key, yes.
Yes, just two points. On the wider cabinet the fixing points are near the top of the window. On the narrow cabinet one is near the top of the window and the other the bottom. The reason is that the front face of the cabinet runs in a plane that is over the glass and the cabinet is not as tall as the top of the window.
I will soon be modifying this to four fixing points for each as just two has proven insufficient. We were away for the weekend and crammed the cabinets full (and boy can you get a lot in them! ------------- ECB 2006 SWB 174 window van
|
Posted By: Ex-car bloke
Date Posted: 28 Jun 10 at 17:20
|
Dub4life, your storage unit looks great. Not come across motexion before but being a furniture maker I really had to go for wood, plus I wanted wipe-clean surfaces not fabric covered. "Cheap plywood", you cheeky bugger! ------------- ECB 2006 SWB 174 window van
|
Posted By: Big-AL
Date Posted: 30 Jun 10 at 08:22
|
Nothing wrong with a bit of cheap ply wood , pulled out my mates shed , with a coat of B+Q black stain on it ------------- "Big-AL doesn't do spelling, but if he did, he would rpobalbe be the best in the world" 2007 Kombi 130 Sportline Alan Ranger www.rangersgarage.co.uk 01980 655555 |
Posted By: Ex-car bloke
Date Posted: 17 Jul 10 at 21:11
|
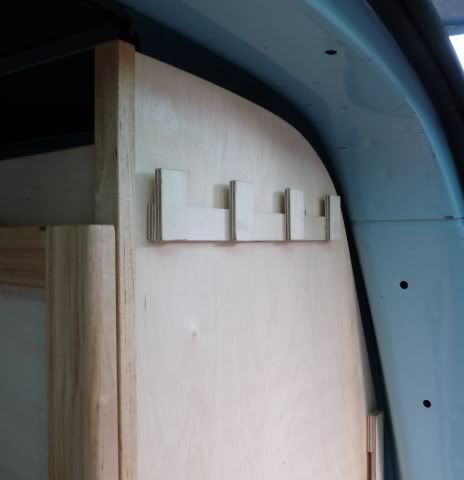
I’ve been busy for a while....my Financial Manager (me) told me to get some paid work done so the van cabinet jobs have been temporarily on hold... However, of the nine remaining jobs I’ve managed to get work done on 1, 2, 4, 6, 7 and 8. The coat hooks and vertical rails are now made and fitted to the wide cabinet, all in 6mm birch ply to match the rest of the cabinet. The rails will take Velcro straps to tie back whatever is stored or hung on the cabinet end – coats, folding chairs etc. The hooks are designed to be low profile and I have a second row of hooks to fit about half way down, for children’s coats and other shorter stuff.
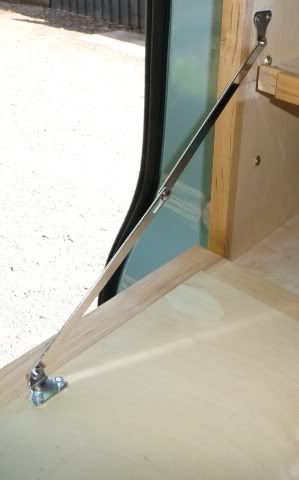
I also have a similar system to fit to the narrow cabinet. The big top-hinged door on the wide cabinet now has lightweight stays fitted. These are excellent; they click in place when you open the door by 90 degrees and to release them you just open the door an extra 10 degrees or so and they allow the door to be closed. A very nice, compact design.
The curtain/blind dilemma was solved when I realised that the megavanmats lining carpet sticks to the Velcro I have already fixed around the window frames for my existing blinds. When I next see her, I’ll get me old Mum to sew Velcro tape around the edge otherwise they’ll get tatty, but for now it does the job, blocking light, protecting the glass and hiding the cabinet contents.
In the meantime I’ve used the cabinets on a couple of weekends away and left them in for day to day use and I have to say they’re superb, but then I would say that wouldn’t I? ------------- ECB 2006 SWB 174 window van
|
Posted By: Ex-car bloke
Date Posted: 22 Jul 10 at 18:09
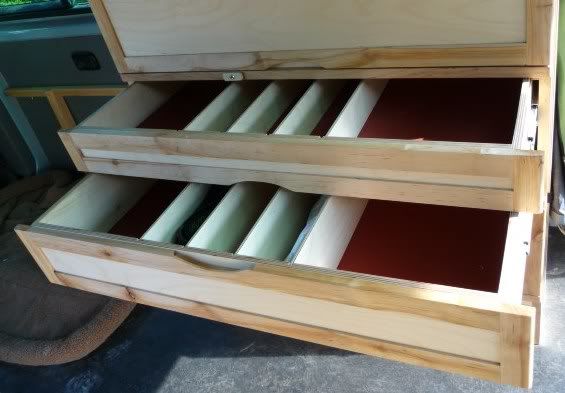
Drawer dividers made and fitted.
 ------------- ECB 2006 SWB 174 window van
|
Posted By: Ex-car bloke
Date Posted: 27 Jul 10 at 16:56
|
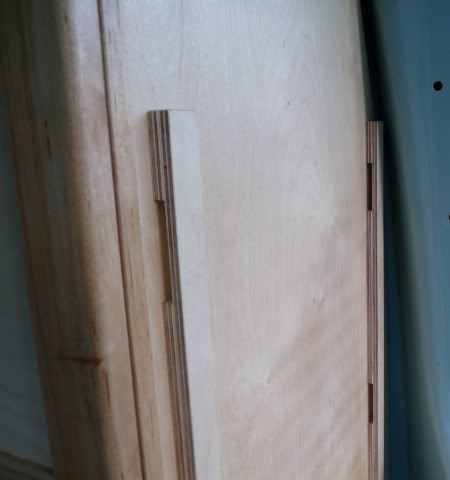
I got most of the final jobs done today. We’re camping the week after next so the pressure is on! I also need to fit my new Reimo rail but that’s another story... The first job of the day was to finish fixing the vertical luggage rails to the cabinet ends. These have been simple to make but quite time-consuming. I fixed them from inside the cabinet so that the outside appearance remains screw-free. I used my usual screw of choice, Spax T-Star, which self-tap into the wood and bite very strongly, so I’m confident of fixing the rails without glue. The combined thickness was 24mm so I used 25mm screws with a brass cup washer. The left hand narrow cabinet was fitted with rails and coat hooks.
This is the front face of the same cabinet, with just a set of four coat hooks still to be made and added.
The wider right hand cabinet was fitted with another set of rails and four hooks on the front face - I did the rear face last time.
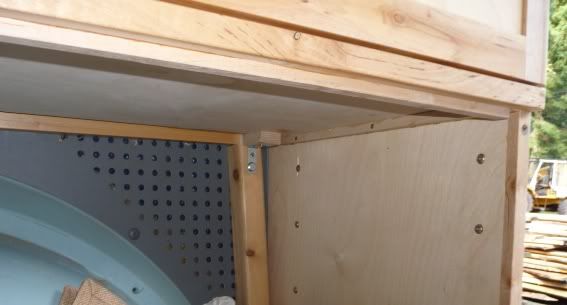
Next, the two fixings near the tops of the cabinets that secured them to the van were supplemented by two lower fixings. On my first test run I found that the cabinets, when stuffed full of heavy contents, were forced away from the van side near the unsecured bottom. As before, I used angle brackets, M6 threaded inserts and M6 allen-headed bolts. The existing softwood frame (used previously for my full-width bed deck) made this task easy.
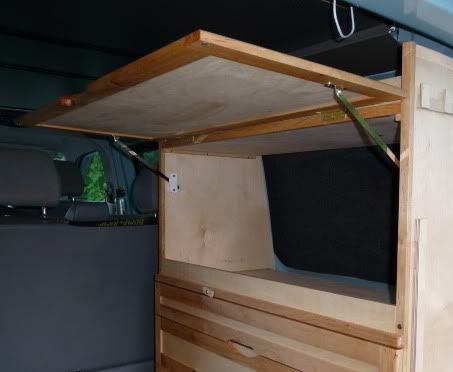
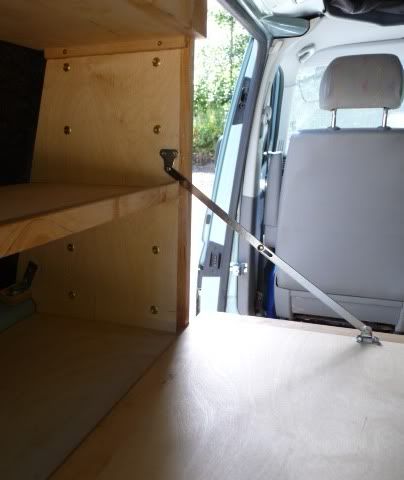
I’ve been thinking lately about crashproofness of the whole set-up. As in “What would happen to it in event of a collision?” I feel confident that these four-point fixings are substantial enough to stop the whole thing being ripped off the van, as it's very solid now. In any case, the double rear seat would stop the big cabinet if it did come unstuck. Anyway, back to the final job of the day, fixing the stays to the top door of the narrow cabinet, which becomes my fold-down worktop for cooking and preparing food etc. The steel stays are lightweight but very strong. To be sure the table top will take a bit of abuse, I decided to bolt through the door end of the stays rather than just use screws. I used M4 bolts with locknuts. It was an absolute bugger of a job, for two reasons. One, the manufacturer’s instructions had the geometry dimensions wrong, so I ended up having to use trial and error to (eventually) get the right locations for each end. And two, some idiot (me) had put the shelf right in the way of the desired location of the fixing point of the stay. Because the shelf and the support were glued in place, it was a bastard of a job to do without wrecking the cabinet and I had to make various cut-outs in the corner of the shelf for the stay and the heads of the nuts that protruded from the door fixing. Several hours later I had a very sturdy table top opening perfectly to exactly 90 degrees so I was well pleased despite the cursing and wasted time.
I’m pretty much at the finish line now with the job, and ready to rock and roll. I’m not sure I need to bother with the planned carpet lining to the shelves as it will just make them harder to keep clean. I think I’ll use them for a bit and see how I get on. A planned future development is to cut away the top 120mm of the front face of the wide cabinet. This is the bit that protrudes above the top shelf. Removing it will allow me to carry a couple of windsurfing sails, a mast and a boom in the long thin space above the cabinet and along the top right hand side of the van to the driver’s headrest. ------------- ECB 2006 SWB 174 window van
|
Posted By: oldgit
Date Posted: 31 Jan 11 at 00:06
|
Hi Ross,
What a real craftsmans job !
Would you still have the Word.doc that you could email to me ?
I`m trying to get rear furniture made for my lwb Shuttle T5 (extra 13" behind twin sliding doors; mirror image on either side, gap right down the middle with two fold forward single rear bed/seats at the `C` pillars).
I know a local chippy that your article may just inspire as to what can be achieved !
regards,
Olgit.
email:
mailto:peter_taylorpt@yahoo.co.uk - peter_taylorpt@yahoo.co.uk
|
Posted By: Ex-car bloke
Date Posted: 05 Feb 11 at 20:53
|
Peter, email in your inbox. ------------- ECB 2006 SWB 174 window van
|
Posted By: edpd1b
Date Posted: 06 Jul 11 at 22:04
|
Superb workmanship...
My van arrives tomorrow, I cant wait to get stuck into kitting it out. I have until the end of the month so is going to be a task to get it all done.
Inspirational work, mine will be marginally less quality I think. Nice One
|
Posted By: Ex-car bloke
Date Posted: 21 Aug 11 at 07:48
|
Thanks Ed. We're off to Ireland for a fortnight so the wide cabinet is being taken out of storage and getting bolted back in this week.
They've been used and abused and are wearing well. I keep the narrow one in permanently. It adds loads of storage without using up any of the floor space. Worth all the hassle involved in their making!
Hope all goes well with your project. ------------- ECB 2006 SWB 174 window van
|